
Spring is one of the most inspiring seasons for baking, and if you are looking for the most beautiful and delicious ways to enjoy it, you are in exactly the right place. These 22 dreamy spring dessert ideas are bursting with the freshest seasonal flavors — from delicate floral notes and bright citrus to juicy ripe berries and warm, comforting spices that make every bite feel like a breath of fresh air. Whether you are hosting a spring gathering, planning a fun weekend brunch, or simply treating yourself to something sweet after a warm afternoon, this collection of easy spring dessert recipes has everything you need to make this season truly unforgettable. Every single recipe was chosen to capture the very essence of spring in the most delicious way possible.
The best part? These spring dessert ideas are designed to highlight fresh seasonal ingredients while staying approachable and easy to make at home. These homemade spring desserts range from light and refreshing to rich and indulgent, so no matter what you are craving, there is something here made just for you. Some are elegant enough to impress guests at a dinner party, while others are simple enough to whip up on a quiet weekend afternoon with ingredients you likely already have on hand. From fruity and fresh delights to creamy, decadent treats and everything in between, this lineup of spring baking recipes is guaranteed to become your go-to seasonal inspiration. Keep scrolling — your new favorite spring dessert is waiting for you somewhere on this list!
Disclaimer: The nutritional and health-related information mentioned throughout this article is intended for general informational purposes only and is not a substitute for professional medical or dietary advice. Always consult a qualified healthcare provider regarding any health concerns or dietary needs. Results may vary depending on ingredient brands and individual preparation methods.
Fruity & Fresh Delights
Spring is the season when fresh fruits take center stage, and these desserts highlight every juicy, vibrant bite. From tangy citrus to sweet berries, this category highlights the brightest flavors the season has to offer. These recipes are light enough to enjoy after a warm afternoon meal yet impressive enough for entertaining guests. They bring a refreshing, garden-fresh quality that feels perfectly aligned with spring’s natural beauty.
1. Lemon Lavender Panna Cotta
Prep Time: 15 minutes | Cook Time: 15 minutes | Chill Time: 4 hours | Serves: 6
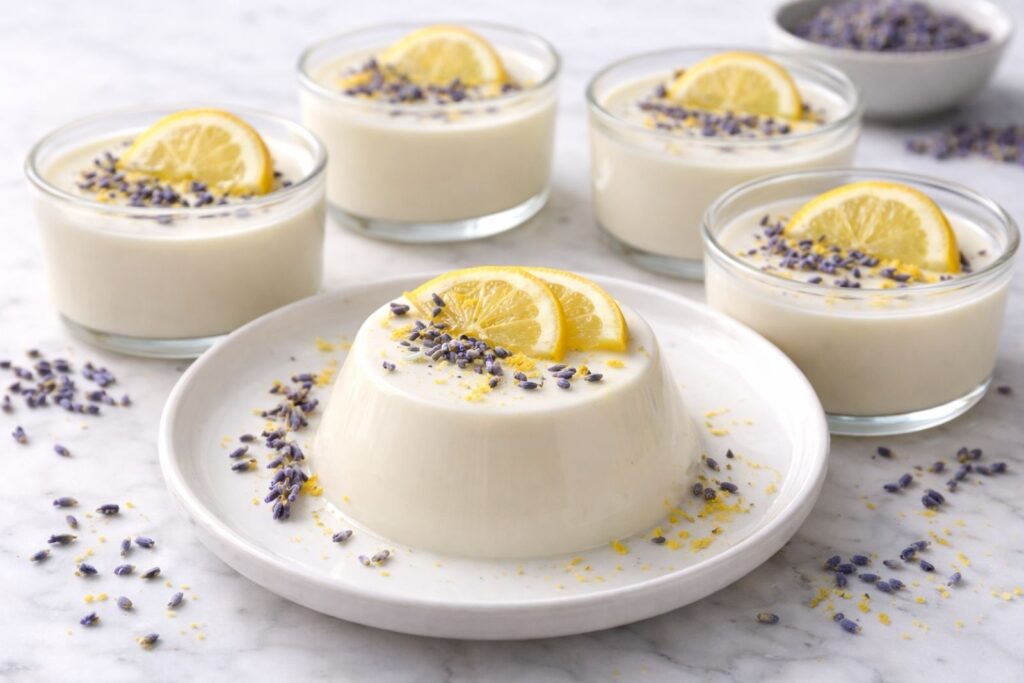
This silky Italian dessert gets a springtime upgrade with the floral notes of lavender and the bright zing of lemon, making it feel effortlessly elegant. Lemon is rich in vitamin C and antioxidants, while lavender has natural calming properties that support relaxation. It’s a light, dairy-based treat that feels indulgent without being too heavy for warm spring days.
Ingredients:
- 2 cups heavy cream
- 1 cup whole milk
- ⅓ cup granulated sugar
- 1½ teaspoons dried culinary lavender buds
- 1 tablespoon lemon zest
- 2 tablespoons fresh lemon juice
- 2¼ teaspoons unflavored powdered gelatin
- 3 tablespoons cold water
- 1 teaspoon pure vanilla extract
- 1 pinch of sea salt
- Fresh lemon slices or edible flowers, for garnish
How to Make It:
- Pour the cold water into a small bowl and sprinkle the gelatin evenly over the surface. Let it sit undisturbed for 5–7 minutes until it becomes spongy and fully bloomed. Do not stir.
- In a medium saucepan over medium-low heat, combine the heavy cream, whole milk, sugar, lavender buds, and sea salt. Stir gently and heat until the mixture just begins to steam and small bubbles form around the edges — do not let it boil. Remove from heat.
- Cover the saucepan and let the lavender steep in the warm cream for 10 minutes to allow the floral notes to fully infuse.
- Pour the infused cream through a fine mesh strainer into a clean bowl or large measuring cup, pressing lightly on the lavender buds to extract their flavor. Discard the buds.
- While the cream is still warm, add the bloomed gelatin and whisk gently until completely dissolved with no lumps remaining. Stir in the lemon zest, lemon juice, and vanilla extract. Taste and adjust sweetness as desired.
- Lightly grease 6 ramekins or small dessert glasses with a neutral oil. Divide the panna cotta mixture evenly among them. Let them cool at room temperature for 15 minutes before transferring to the refrigerator.
- Refrigerate for at least 4 hours or overnight until fully set with a gentle, silky jiggle in the center.
- To unmold, run a thin knife around the edge of each ramekin and invert onto a serving plate with a gentle shake. Alternatively, serve directly in the glass. Garnish with fresh lemon slices or edible flowers and an extra pinch of lemon zest for a fresh, beautiful finish.
Tip:
Don’t steep the lavender longer than 12 minutes or the flavor can turn soapy. Lightly brush ramekins with a flavorless oil like grapeseed for the cleanest unmolding.
2. Strawberry Rose Shortcakes
Prep Time: 20 minutes | Cook Time: 15 minutes | Serves: 8
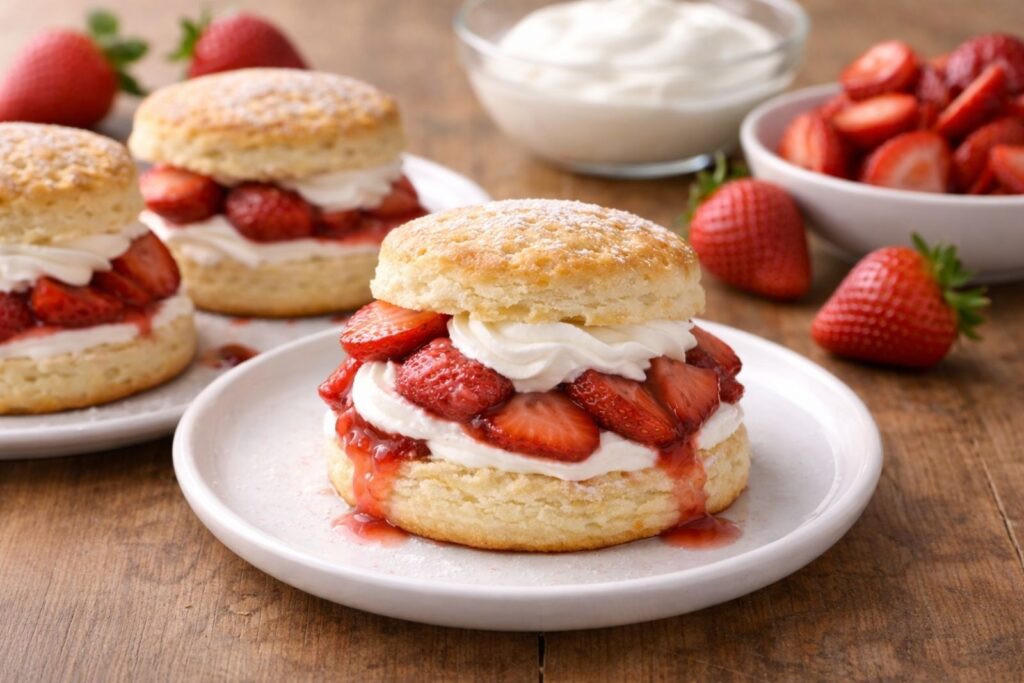
Fluffy, buttery shortcakes layered with fresh strawberries and a hint of rose water create a dessert that looks and tastes like spring in every bite. Strawberries are packed with vitamin C, fiber, and heart-healthy antioxidants that make this treat as nourishing as it is delicious. The delicate floral rose note makes it feel special and celebratory, perfect for spring brunches or afternoon gatherings.
Ingredients:
For the Shortcakes:
- 2 cups all-purpose flour
- 1 tablespoon baking powder
- 3 tablespoons granulated sugar
- ½ teaspoon sea salt
- ½ cup cold unsalted butter, cubed
- ¾ cup cold heavy cream, plus more for brushing
- 1 teaspoon pure vanilla extract
For the Strawberry Rose Filling:
- 2 pounds fresh strawberries, hulled and sliced
- 3 tablespoons granulated sugar
- 1½ teaspoons rose water
- 1 teaspoon fresh lemon juice
For the Whipped Cream:
- 1½ cups heavy cream, cold
- 2 tablespoons powdered sugar
- ½ teaspoon rose water
- ½ teaspoon pure vanilla extract
How to Make It:
- Preheat your oven to 425°F (220°C). Line a baking sheet with parchment paper and set aside.
- In a large bowl, whisk together the flour, baking powder, sugar, and sea salt until well combined.
- Add the cold cubed butter to the flour mixture. Using your fingertips or a pastry cutter, work the butter into the flour until the mixture resembles coarse crumbs with some pea-sized pieces remaining — this is what creates those beautiful flaky layers.
- Make a well in the center of the mixture. Pour in the cold heavy cream and vanilla extract. Stir gently with a fork just until the dough comes together — do not overmix or the shortcakes will become tough.
- Turn the dough out onto a lightly floured surface and gently pat it into a ¾-inch thick rectangle. Fold it over itself once, then pat it back out. This folding technique creates extra layers and lift.
- Use a 2½-inch round biscuit cutter to cut out shortcakes, pressing straight down without twisting. Re-pat the scraps and cut out the remaining rounds. You should get about 8 shortcakes.
- Place them on the prepared baking sheet, brush the tops lightly with heavy cream, and bake for 13–15 minutes until risen and golden brown on top. Let them cool on a wire rack.
- While the shortcakes bake, prepare the strawberry filling. Combine the sliced strawberries, sugar, rose water, and lemon juice in a bowl. Toss gently and let them macerate for at least 15 minutes until the strawberries release their natural juices and become beautifully glossy.
- Make the whipped cream by beating the cold heavy cream, powdered sugar, rose water, and vanilla extract together with a hand mixer or stand mixer on medium-high speed until soft, billowy peaks form. Do not overwhip.
- To assemble, slice each shortcake in half horizontally. Spoon a generous amount of the macerated strawberries and their juices onto the bottom half. Add a dollop of rose whipped cream, then place the top half of the shortcake over it. Finish with a few more strawberries and another swirl of whipped cream for a stunning presentation.
Tip:
Keep your butter and cream as cold as possible throughout — cold fat is the secret to tall, tender, flaky shortcakes. If your kitchen is warm, pop the cubed butter back in the freezer for 10 minutes before using.
3. Rhubarb Crumble Bars
Prep Time: 20 minutes | Cook Time: 40 minutes | Serves: 12
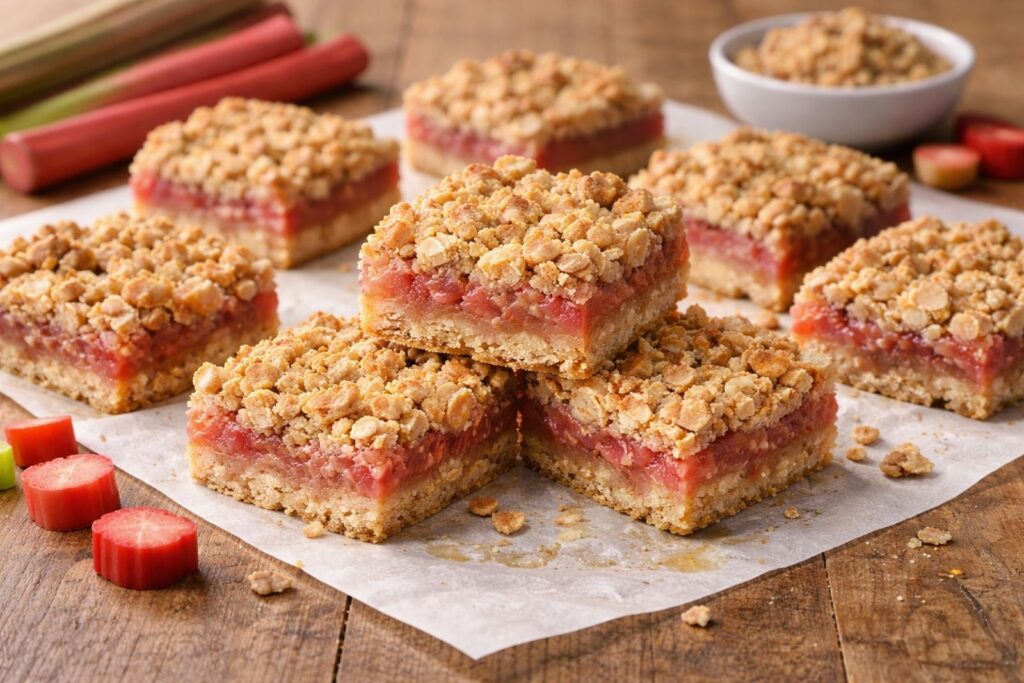
These handheld bars balance tart rhubarb with a sweet oat crumble topping for a satisfying, rustic spring dessert. Rhubarb is a great source of vitamin K, calcium, and dietary fiber, supporting bone health and digestion. The crumble format makes them easy to serve at picnics, potlucks, or casual spring get-togethers.
Ingredients:
For the Oat Base and Crumble:
- 2 cups old-fashioned rolled oats
- 1½ cups all-purpose flour
- ¾ cup packed light brown sugar
- ½ teaspoon cinnamon
- ¼ teaspoon sea salt
- ¾ cup unsalted butter, melted
- 1 teaspoon pure vanilla extract
For the Rhubarb Filling:
- 4 cups fresh rhubarb, trimmed and diced into ½-inch pieces
- ½ cup granulated sugar
- 2 tablespoons cornstarch
- 1 tablespoon fresh lemon juice
- 1 teaspoon lemon zest
- ½ teaspoon pure vanilla extract
How to Make It:
- Preheat your oven to 350°F (175°C). Grease a 9×13-inch baking pan and line it with parchment paper, leaving some overhang on the sides for easy lifting later.
- In a large bowl, combine the rolled oats, flour, brown sugar, cinnamon, and sea salt. Whisk together until evenly mixed. Pour in the melted butter and vanilla extract and stir until the mixture comes together into clumpy, moist crumbles.
- Press just over half of the oat crumble mixture firmly and evenly into the bottom of the prepared pan to form the base layer. Set the remaining crumble aside for the topping.
- In a separate bowl, combine the diced rhubarb, granulated sugar, cornstarch, lemon juice, lemon zest, and vanilla extract. Toss well until every piece of rhubarb is evenly coated and the mixture looks slightly glossy.
- Spread the rhubarb filling evenly over the pressed oat base, making sure to distribute it all the way to the edges for consistent flavor in every bar.
- Scatter the remaining oat crumble mixture generously over the top of the rhubarb filling, breaking it into varied-sized clumps for a rustic, textured finish.
- Bake for 38–42 minutes until the crumble topping is golden brown and the rhubarb filling is bubbling around the edges. The bubbling is a good sign that the filling has cooked through properly.
- Remove from the oven and allow the bars to cool completely in the pan on a wire rack — at least 1 to 2 hours. This step is essential, as the filling needs time to firm up before slicing.
- Once fully cooled, lift the slab out of the pan using the parchment overhang. Place it on a cutting board and slice into 12 even bars using a sharp knife.
Tip:
Do not skip the cooling time — cutting into warm bars will cause the filling to run. For even cleaner slices, refrigerate the fully cooled bars for 30 minutes before cutting.
4. Meyer Lemon Tart with Whipped Cream
Prep Time: 25 minutes | Cook Time: 35 minutes | Chill Time: 2 hours | Serves: 10
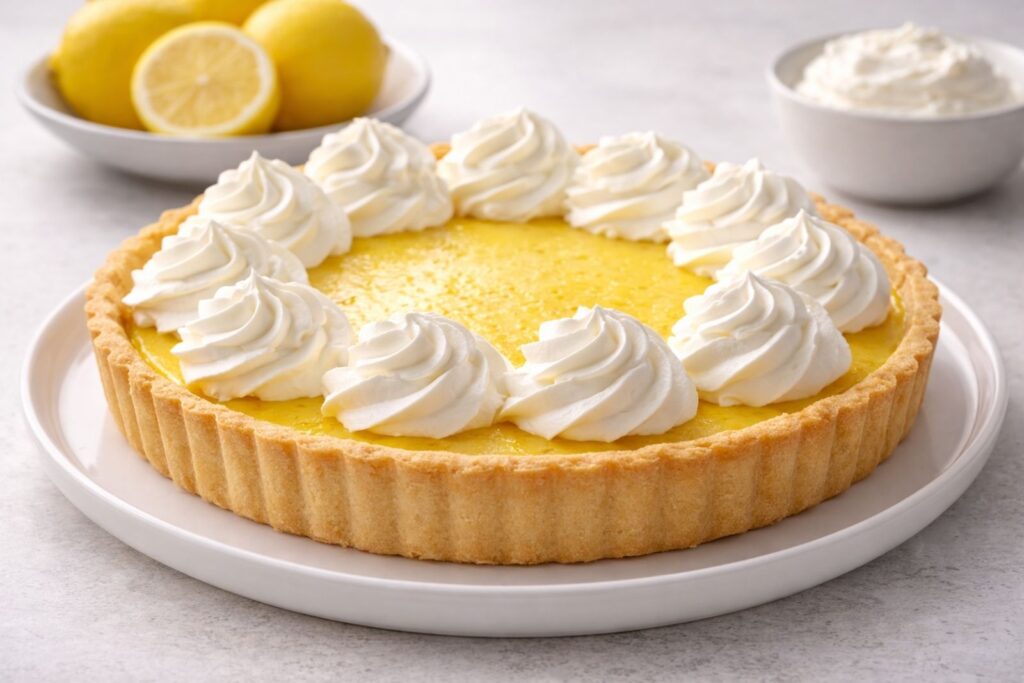
Meyer lemons are sweeter and more fragrant than regular lemons, making this tart a bright, sunshine-filled centerpiece for any spring table. The citrus filling is rich in vitamin C and natural antioxidants that support immune health and glowing skin. Paired with light whipped cream, it strikes the perfect balance between rich and refreshing.
Ingredients:
For the Tart Shell:
- 1½ cups all-purpose flour
- ½ cup powdered sugar
- ¼ teaspoon sea salt
- ½ cup cold unsalted butter, cubed
- 1 large egg yolk
- 2 tablespoons cold water
For the Meyer Lemon Filling:
- 4 large eggs
- 3 large egg yolks
- ¾ cup granulated sugar
- ½ cup fresh Meyer lemon juice (about 4–5 Meyer lemons)
- 1 tablespoon Meyer lemon zest
- ½ cup unsalted butter, cubed
- 1 pinch of sea salt
For the Whipped Cream:
- 1 cup heavy cream, cold
- 2 tablespoons powdered sugar
- ½ teaspoon pure vanilla extract
How to Make It:
- In a large bowl, whisk together the flour, powdered sugar, and sea salt. Add the cold cubed butter and use your fingertips or a pastry cutter to work it into the flour until the mixture resembles coarse, sandy crumbs.
- Add the egg yolk and cold water, mixing gently until the dough just comes together. Shape it into a flat disc, wrap it in plastic wrap, and refrigerate for at least 30 minutes to rest.
- Preheat your oven to 375°F (190°C). On a lightly floured surface, roll the chilled dough out into a circle slightly larger than your 9-inch tart pan. Carefully press it into the pan, trimming any excess dough from the edges. Prick the bottom all over with a fork.
- Line the tart shell with parchment paper and fill it with pie weights or dried beans. Blind bake for 15 minutes, then remove the weights and parchment and bake for another 8–10 minutes until the shell is lightly golden and fully dry. Set aside to cool.
- While the shell cools, prepare the filling. In a medium heatproof bowl, whisk together the eggs, egg yolks, sugar, Meyer lemon juice, lemon zest, and sea salt until smooth and well combined.
- Set the bowl over a saucepan of gently simmering water, making sure the bottom of the bowl does not touch the water. Stir constantly with a spatula for 10–12 minutes until the curd thickens enough to coat the back of a spoon.
- Remove the curd from the heat and add the cubed butter a few pieces at a time, stirring until each piece is fully melted and incorporated. The filling should be smooth, glossy, and beautifully thick.
- Pour the warm lemon curd into the cooled tart shell and smooth the top with a spatula. Allow it to cool at room temperature for 15 minutes, then refrigerate for at least 2 hours until fully set.
- Just before serving, make the whipped cream by beating the cold heavy cream, powdered sugar, and vanilla extract together until soft, airy peaks form. Dollop or pipe it over the tart, or serve it on the side for guests to add as they like.
Tip:
If Meyer lemons are unavailable, substitute with a mix of 3 parts regular lemon juice and 1 part fresh orange juice to mimic their sweeter, more floral flavor.
5. Blueberry Lemon Ricotta Cake
Prep Time: 15 minutes | Cook Time: 50 minutes | Serves: 9
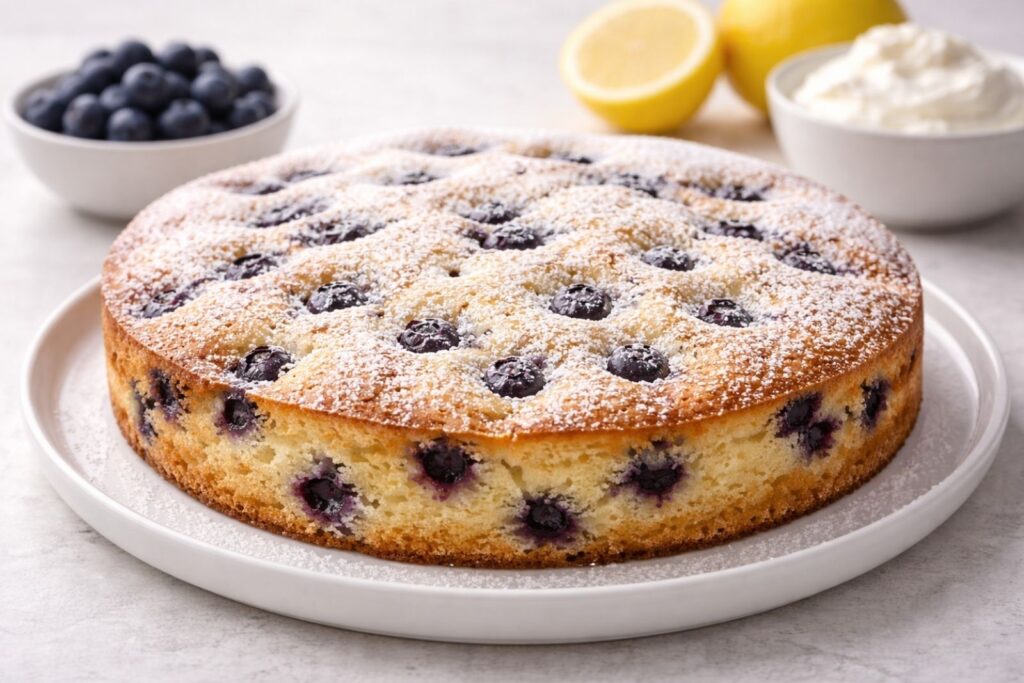
This moist, tender cake combines creamy ricotta with fresh blueberries and lemon for a dessert that feels wholesome and indulgent at once. Blueberries are among the most antioxidant-rich fruits available, supporting brain health, heart health, and immunity. Ricotta adds a boost of protein and calcium, making each slice surprisingly satisfying without feeling overly heavy.
Ingredients:
- 1½ cups all-purpose flour
- 1 teaspoon baking powder
- ½ teaspoon baking soda
- ¼ teaspoon sea salt
- 1 cup whole milk ricotta cheese
- ¾ cup granulated sugar
- ½ cup unsalted butter, softened
- 2 large eggs
- 1 teaspoon pure vanilla extract
- 1 tablespoon lemon zest
- 2 tablespoons fresh lemon juice
- 1½ cups fresh blueberries
- 1 tablespoon all-purpose flour, for tossing the blueberries
- Optional: powdered sugar for dusting
How to Make It:
- Preheat your oven to 350°F (175°C). Grease a 9-inch round cake pan and line the bottom with parchment paper. Set aside.
- In a medium bowl, whisk together the flour, baking powder, baking soda, and sea salt until evenly combined. Set aside.
- In a large bowl, beat the softened butter and granulated sugar together using a hand mixer or stand mixer on medium speed for 2–3 minutes until light, pale, and fluffy.
- Add the eggs one at a time, beating well after each addition. Mix in the vanilla extract, lemon zest, and lemon juice until fully incorporated.
- Add the ricotta cheese to the butter mixture and beat on low speed until smooth and creamy. The batter may look slightly curdled at this stage — that is completely normal and will come together once the flour is added.
- Gently fold the dry ingredients into the wet ingredients using a spatula, stirring just until no streaks of flour remain. Do not overmix, as this will affect the cake’s tender crumb.
- Toss the fresh blueberries with 1 tablespoon of flour in a small bowl until lightly coated. This helps prevent them from sinking to the bottom during baking. Gently fold them into the batter, being careful not to crush them.
- Pour the batter into the prepared cake pan and smooth the top evenly with a spatula. Tap the pan gently on the counter a couple of times to release any air bubbles.
- Bake for 48–52 minutes until the top is golden, the edges pull slightly away from the pan, and a toothpick inserted into the center comes out clean or with just a few moist crumbs.
- Allow the cake to cool in the pan for 15 minutes before transferring it to a wire rack to cool completely. Once cooled, dust generously with powdered sugar just before serving for a beautiful, rustic finish.
Tip:
Use room temperature ricotta, butter, and eggs for the smoothest batter. If your ricotta is watery, drain it through a fine mesh strainer for 15–20 minutes before using.
6. Cherry Almond Galette
Prep Time: 25 minutes | Cook Time: 40 minutes | Chill Time: 30 minutes | Serves: 8

A rustic free-form pastry filled with sweet cherries and fragrant almond cream, this galette is as beautiful as it is simple to make. Cherries are naturally rich in anti-inflammatory compounds and melatonin, which supports restful sleep and overall wellness. The almond filling adds heart-healthy fats and a nutty depth that makes this dessert feel both comforting and sophisticated.
Ingredients:
For the Galette Dough:
- 1¼ cups all-purpose flour
- 1 tablespoon granulated sugar
- ¼ teaspoon sea salt
- ½ cup cold unsalted butter, cubed
- 3–4 tablespoons ice cold water
- 1 teaspoon apple cider vinegar
For the Almond Cream:
- ½ cup almond flour
- 3 tablespoons granulated sugar
- 2 tablespoons unsalted butter, softened
- 1 large egg
- ½ teaspoon pure almond extract
- ½ teaspoon pure vanilla extract
- 1 pinch of sea salt
For the Cherry Filling:
- 2½ cups fresh sweet cherries, pitted and halved
- 2 tablespoons granulated sugar
- 1 teaspoon fresh lemon juice
- 1 teaspoon cornstarch
For Finishing:
- 1 large egg, beaten (for egg wash)
- 1 tablespoon coarse sugar, for sprinkling
- Optional: powdered sugar or a scoop of vanilla ice cream for serving
How to Make It:
- Make the dough by whisking together the flour, sugar, and sea salt in a large bowl. Add the cold cubed butter and use your fingertips or a pastry cutter to work it in until the mixture resembles rough, pea-sized crumbs with visible chunks of butter still present — those chunks are what create a flaky crust.
- Drizzle in the apple cider vinegar and ice cold water one tablespoon at a time, stirring gently with a fork after each addition just until the dough holds together when pressed. Shape it into a flat disc, wrap in plastic wrap, and refrigerate for 30 minutes.
- While the dough chills, prepare the almond cream. In a small bowl, beat together the almond flour, sugar, softened butter, egg, almond extract, vanilla extract, and sea salt until smooth and creamy. Set aside.
- In a separate bowl, combine the pitted and halved cherries with the sugar, lemon juice, and cornstarch. Toss gently until every cherry is well coated and glossy. Set aside to macerate for 10 minutes.
- Preheat your oven to 400°F (200°C). Line a large baking sheet with parchment paper.
- On a lightly floured surface, roll the chilled dough out into a rough 12-inch circle — it does not need to be perfect, as the imperfect edges are part of the galette’s rustic charm. Transfer it carefully onto the prepared baking sheet.
- Spread the almond cream evenly over the center of the dough, leaving a 2-inch border all around the edges. Spoon the macerated cherries over the almond cream, distributing them evenly in a single layer.
- Fold the edges of the dough up and over the outer ring of the filling, pleating as you go to create a rustic border. Press gently to seal any cracks so the juices do not leak out during baking.
- Brush the folded crust edges generously with the beaten egg wash and sprinkle with coarse sugar for a beautifully golden, sparkling finish.
- Bake for 38–42 minutes until the crust is deep golden brown and the cherry filling is bubbling and fragrant. Allow the galette to cool on the baking sheet for at least 20 minutes before slicing so the filling can settle.
- Slice into wedges and serve warm or at room temperature. Dust lightly with powdered sugar or add a scoop of vanilla ice cream alongside for an extra indulgent touch.
Tip:
If fresh cherries aren’t in season, frozen cherries work beautifully — just thaw completely and pat dry before using to keep the filling from becoming too watery.
Creamy & Decadent Treats
Sometimes spring calls for something lush, velvety, and utterly indulgent, and this category delivers just that. These creamy desserts use seasonal flavors like honey, strawberry, and coconut to feel fresh without sacrificing richness. They’re perfect for dinner parties or any moment when you want something extra special. Each one is designed to feel luxurious yet approachable enough to make at home.
7. Honey Vanilla Bean Cheesecake
Prep Time: 25 minutes | Cook Time: 55 minutes | Chill Time: 4 hours | Serves: 12
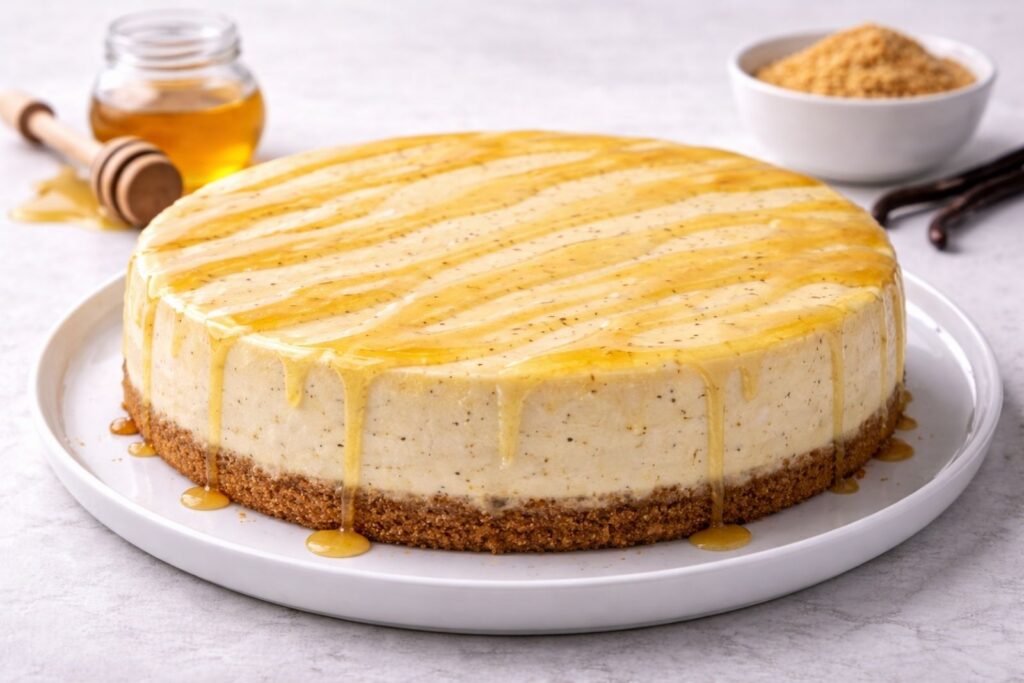
This dreamy cheesecake is sweetened with natural honey and perfumed with real vanilla bean for a flavor that is warm, floral, and deeply satisfying. Honey contains antioxidants and has natural antibacterial properties, making it a more wholesome sweetener than refined sugar. The combination of creamy texture and aromatic vanilla makes this a showstopping spring centerpiece that everyone will love.
Ingredients:
For the Crust:
- 2 cups graham cracker crumbs
- 3 tablespoons granulated sugar
- ½ teaspoon cinnamon
- 6 tablespoons unsalted butter, melted
For the Cheesecake Filling:
- 24 ounces full-fat cream cheese, softened to room temperature
- ½ cup raw honey
- 3 tablespoons granulated sugar
- 3 large eggs, room temperature
- 1 cup full-fat sour cream
- 1 vanilla bean, split and seeds scraped
- 1 teaspoon pure vanilla extract
- 2 tablespoons all-purpose flour
- 1 pinch of sea salt
For the Honey Glaze:
- 3 tablespoons raw honey
- 1 tablespoon warm water
- Optional: fresh edible flowers or thinly sliced figs for garnish
How to Make It:
- Preheat your oven to 325°F (163°C). Grease a 9-inch springform pan and wrap the outside tightly with two layers of aluminum foil to prepare for the water bath.
- In a medium bowl, stir together the graham cracker crumbs, sugar, cinnamon, and melted butter until the mixture resembles wet sand and holds together when pressed. Transfer it into the prepared springform pan and press it firmly and evenly across the bottom and slightly up the sides using the back of a spoon or flat-bottomed glass.
- Bake the crust for 10 minutes until lightly set and fragrant. Remove from the oven and allow it to cool completely while you prepare the filling.
- In a large bowl, beat the softened cream cheese on medium speed until completely smooth and lump-free, about 2–3 minutes. Scrape down the sides of the bowl as needed.
- Add the honey and granulated sugar to the cream cheese and beat on low speed until fully incorporated and silky smooth. Add the vanilla bean seeds, vanilla extract, and sea salt, mixing until evenly distributed throughout the batter.
- Add the eggs one at a time, beating on the lowest speed just until each one is incorporated. Overmixing at this stage incorporates too much air and can cause the cheesecake to crack during baking.
- Add the sour cream and flour and fold gently until just combined and the batter is smooth and glossy. Do not overmix.
- Pour the filling over the cooled crust and smooth the top evenly with a spatula. Place the foil-wrapped springform pan into a large roasting pan and pour enough hot water into the roasting pan to reach halfway up the sides of the springform pan, creating a water bath.
- Bake for 52–58 minutes until the edges are set and the center has a slight, gentle jiggle when the pan is nudged. The cheesecake will continue to firm up as it cools — do not overbake.
- Turn off the oven and crack the door open slightly. Allow the cheesecake to rest inside the oven for 1 hour to cool gradually and prevent cracking. Then remove it from the water bath and let it cool completely on a wire rack.
- Once at room temperature, refrigerate the cheesecake uncovered for at least 4 hours or overnight until fully set and chilled through.
- Just before serving, stir together the honey and warm water to make the glaze and drizzle it beautifully over the top. Garnish with edible flowers or thinly sliced figs if desired, then release the springform and slice into clean wedges.
Tip:
For the cleanest slices, dip a sharp knife in hot water and wipe it dry between each cut for effortless, beautiful results.
8. Coconut Lime Mousse Cups
Prep Time: 20 minutes | Chill Time: 2 hours | Serves: 6
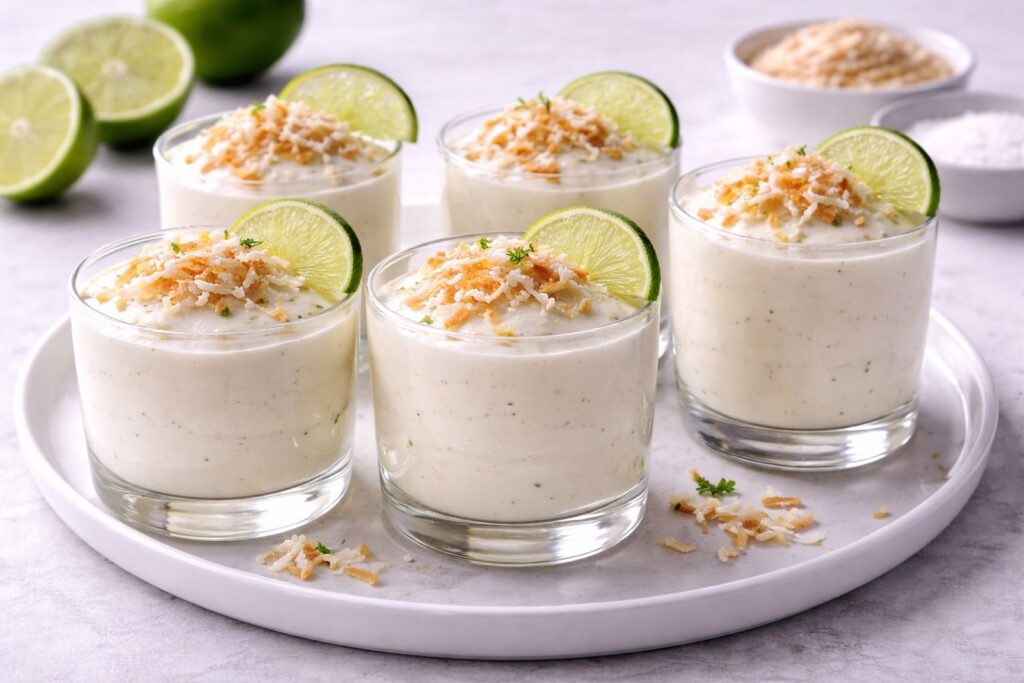
Light, airy, and tropical, these mousse cups bring a bright burst of lime and creamy coconut to your spring dessert table. Coconut contains medium-chain triglycerides (MCTs) that support energy and metabolism, while lime is rich in vitamin C and aids digestion. Served in individual cups, they’re as elegant to present as they are effortless to enjoy.
Ingredients:
- 1 can (13.5 ounces) full-fat coconut cream, refrigerated overnight
- 4 ounces full-fat cream cheese, softened to room temperature
- ⅓ cup powdered sugar, sifted
- 3 tablespoons fresh lime juice (about 2 limes)
- 1 tablespoon lime zest, plus more for garnish
- 1 teaspoon pure vanilla extract
- ½ cup heavy whipping cream, cold
- 2 tablespoons toasted shredded coconut, for garnish
- Optional: thin lime slices or fresh mint leaves for garnish
How to Make It:
- The night before, place the can of coconut cream in the refrigerator so the cream separates and solidifies. When ready to begin, open the can without shaking it and carefully scoop out the thick, solidified coconut cream into a large chilled bowl, leaving the liquid behind. Reserve the coconut liquid for another use if desired.
- Using a hand mixer or stand mixer fitted with the whisk attachment, beat the solidified coconut cream on medium-high speed for 1–2 minutes until light, fluffy, and whipped. Transfer it to a separate bowl and refrigerate while you prepare the next step.
- In the same large bowl, beat the softened cream cheese on medium speed until completely smooth and free of any lumps, about 2 minutes. Scrape down the sides of the bowl as needed to ensure even mixing.
- Add the powdered sugar, fresh lime juice, lime zest, and vanilla extract to the cream cheese and beat on low speed until everything is fully incorporated and the mixture is silky, smooth, and fragrant. Taste and adjust the lime juice or zest to your preference.
- In a separate chilled bowl, beat the cold heavy whipping cream on medium-high speed until soft, billowy peaks form. Be careful not to overwhip — you want it light and airy, not stiff.
- Gently fold the whipped coconut cream into the cream cheese mixture using a large spatula, using slow, sweeping motions to preserve the airiness. Once combined, gently fold in the whipped heavy cream in two additions until the mousse is smooth, fluffy, and beautifully unified. Do not stir aggressively or the mousse will deflate.
- Spoon or pipe the mousse evenly into 6 individual serving cups or glasses. Smooth the tops lightly with the back of a spoon for a clean, polished presentation.
- Cover each cup loosely with plastic wrap and refrigerate for at least 2 hours until the mousse is set, chilled, and perfectly firm yet pillowy.
- Just before serving, garnish each cup with toasted shredded coconut, a pinch of fresh lime zest, and a thin lime slice or sprig of fresh mint if desired. Serve immediately straight from the refrigerator.
Tip:
For the cleanest slices, dip a sharp knife in hot water and wipe it dry between each cut for effortless, beautiful results.
9. White Chocolate Raspberry Parfaits
Prep Time: 25 minutes | Cook Time: 5 minutes | Chill Time: 1 hour | Serves: 4
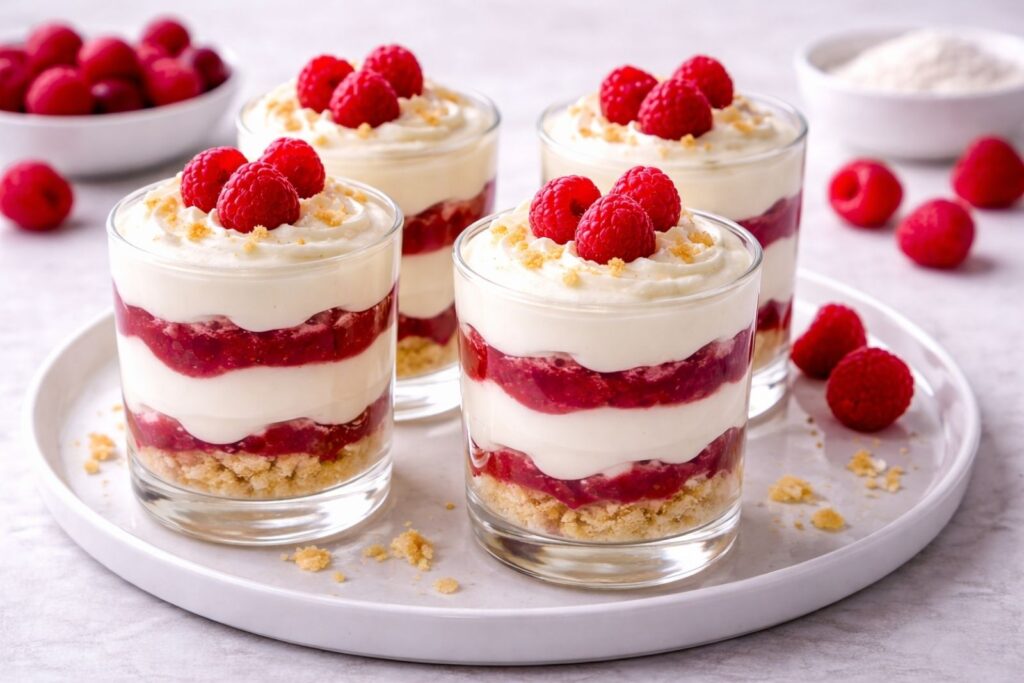
Layers of silky white chocolate cream and fresh raspberries make these parfaits a visually stunning and deliciously balanced spring dessert. Raspberries are loaded with fiber, vitamin C, and powerful antioxidants that promote heart health and reduce inflammation. The contrast of sweet white chocolate and tart raspberry creates a flavor combination that feels both playful and refined.
Ingredients:
For the White Chocolate Cream:
- 6 ounces high-quality white chocolate, finely chopped
- 1½ cups heavy whipping cream, cold and divided
- 4 ounces full-fat cream cheese, softened to room temperature
- 2 tablespoons powdered sugar, sifted
- 1 teaspoon pure vanilla extract
- 1 pinch of sea salt
For the Raspberry Layer:
- 2 cups fresh raspberries, divided
- 2 tablespoons granulated sugar
- 1 teaspoon fresh lemon juice
For the Layers:
- 1 cup shortbread cookies or vanilla wafers, roughly crushed
- Optional: fresh mint leaves and extra raspberries for garnish
How to Make It:
- Begin by making the raspberry sauce. In a small saucepan over medium-low heat, combine 1 cup of the fresh raspberries, granulated sugar, and fresh lemon juice. Stir gently and cook for 4–5 minutes until the raspberries have broken down and the mixture has thickened slightly into a loose, jammy sauce. Remove from heat and allow it to cool completely to room temperature. Once cooled, press it through a fine mesh strainer if you prefer a smooth sauce, or leave it as is for a more rustic texture.
- Melt the white chocolate using a double boiler or in a microwave-safe bowl in 20-second intervals, stirring well between each interval until completely smooth and glossy. Set aside and allow it to cool to room temperature — it should no longer feel warm to the touch before you proceed.
- In a large bowl, beat the softened cream cheese on medium speed until completely smooth and lump-free, about 2 minutes. Add the powdered sugar, vanilla extract, and sea salt, and beat until fully incorporated and silky.
- Pour the cooled melted white chocolate into the cream cheese mixture and beat on low speed until everything is evenly combined and beautifully smooth. Scrape down the sides of the bowl as needed.
- In a separate chilled bowl, whip ¾ cup of the cold heavy whipping cream on medium-high speed until soft, fluffy peaks form. Gently fold the whipped cream into the white chocolate cream cheese mixture in two additions, using slow sweeping motions to keep the mixture light and airy. Refrigerate for 15 minutes to firm up slightly.
- While the cream chills, whip the remaining ¾ cup of cold heavy whipping cream to soft peaks and set aside — this will be used as a finishing dollop on top of each parfait for an extra layer of lightness and elegance.
- Now begin assembling the parfaits. Divide the crushed shortbread cookies evenly among 4 serving glasses as the base layer, pressing them down lightly to create a firm foundation.
- Spoon or pipe a generous layer of the white chocolate cream over the cookie base in each glass. Add a spoonful of the cooled raspberry sauce over the cream, then place a few fresh raspberries on top for texture and color.
- Repeat the layering process — white chocolate cream, raspberry sauce, and fresh raspberries — until the glasses are filled, finishing with a final layer of white chocolate cream at the very top.
- Top each parfait with a small dollop of the reserved whipped cream, a few fresh raspberries, and a sprig of fresh mint if desired. Cover loosely and refrigerate for at least 1 hour before serving to allow the layers to settle and the flavors to meld beautifully.
Tip:
For gorgeous, defined layers, use a piping bag fitted with a round tip to add the white chocolate cream — it gives you clean, precise layers every time.
10. Pistachio Cardamom Pots de Crème
Prep Time: 20 minutes | Cook Time: 45 minutes | Chill Time: 3 hours | Serves: 6
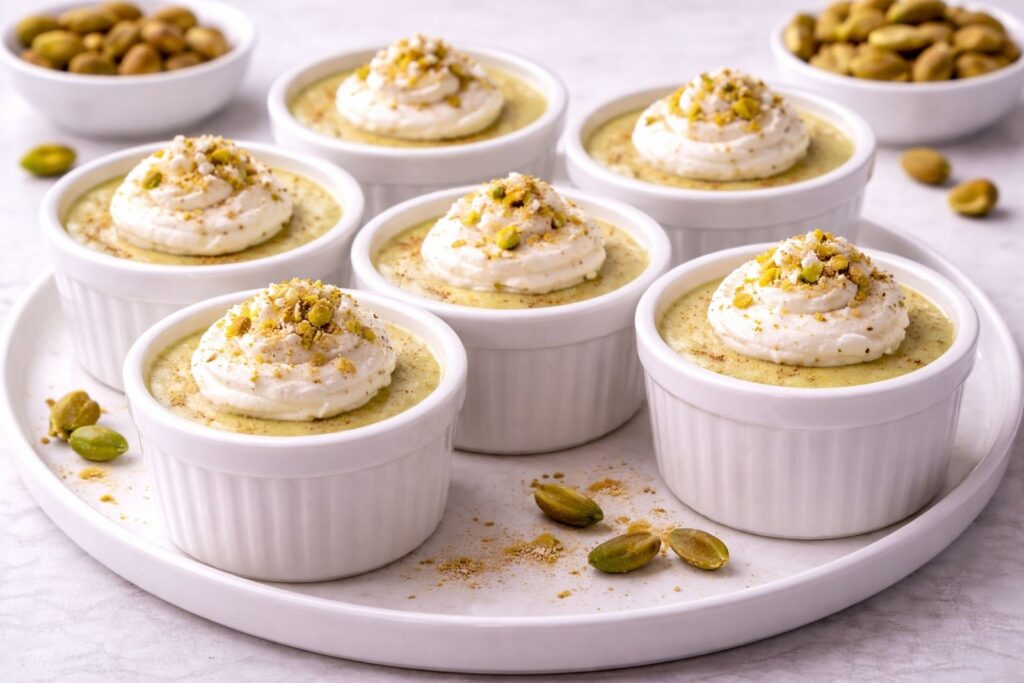
These individual baked custards are infused with earthy pistachio and warm cardamom for a dessert that feels exotic and utterly unique. Pistachios are one of the most nutrient-dense nuts, offering protein, healthy fats, and potassium that support heart and muscle health. Cardamom has long been used in traditional medicine for its digestive and anti-inflammatory benefits, adding both flavor and function to this elegant treat.
Ingredients:
- ½ cup raw unsalted pistachios, shelled
- 2 cups heavy whipping cream
- ½ cup whole milk
- ⅓ cup granulated sugar
- 5 large egg yolks, room temperature
- 1 teaspoon ground cardamom
- ½ teaspoon pure vanilla extract
- 1 pinch of sea salt
- Optional: lightly sweetened whipped cream, crushed pistachios, and a dusting of cardamom for garnish
How to Make It:
- Preheat your oven to 325°F (163°C). Place six 4-ounce ramekins into a large, deep roasting pan and set aside. Bring a kettle or pot of water to a boil for the water bath.
- Add the raw pistachios to a food processor or high-powered blender and process for 1–2 minutes until they are very finely ground into a coarse, flour-like consistency. Be careful not to over-process into a paste — you want a fine crumb, not pistachio butter.
- In a medium saucepan over medium heat, combine the heavy whipping cream, whole milk, granulated sugar, ground cardamom, and finely ground pistachios. Stir gently and heat the mixture until it just begins to steam and small bubbles form around the edges — do not allow it to boil. Remove from heat, cover with a lid, and allow the mixture to steep for 15 minutes so the pistachios and cardamom can fully infuse their flavor into the cream.
- After steeping, pour the cream mixture through a fine mesh strainer into a clean bowl or large measuring cup, pressing down firmly on the solids with the back of a spoon to extract every bit of pistachio-infused cream. Discard the solids left in the strainer.
- In a large bowl, whisk the egg yolks until smooth and slightly pale. Slowly pour the warm pistachio cream into the egg yolks in a thin, steady stream, whisking constantly as you pour. This process, called tempering, gradually raises the temperature of the yolks without scrambling them. Add the vanilla extract and sea salt and whisk until everything is evenly combined.
- Skim off any foam or bubbles that have formed on the surface of the custard using a spoon — this ensures a perfectly smooth, glassy top on each pot de crème once baked.
- Carefully ladle or pour the custard evenly into the six prepared ramekins, filling each one about three-quarters of the way full. Pour the boiling water into the roasting pan until it reaches halfway up the sides of the ramekins, creating a gentle water bath that will help the custards bake evenly and prevent cracking.
- Carefully transfer the roasting pan to the oven and bake for 38–45 minutes until the edges of each custard are set but the centers still have a soft, subtle wobble when gently nudged. They will continue to firm up as they cool — do not overbake or the texture will become grainy rather than silky.
- Carefully remove the ramekins from the water bath using tongs or a kitchen towel and place them on a wire rack. Allow them to cool completely to room temperature, then cover each one loosely with plastic wrap and refrigerate for at least 3 hours or overnight until fully chilled and set.
- When ready to serve, remove the pots de crème from the refrigerator and let them sit at room temperature for 5 minutes. Top each one with a small dollop of lightly sweetened whipped cream, a pinch of crushed pistachios, and a delicate dusting of ground cardamom for a beautiful, fragrant finish.
Tip: Straining the custard twice guarantees an impossibly smooth, velvety texture. That extra minute of effort is what makes a truly exceptional pot de crème.
11. Strawberry Basil Cream Cheese Tart
Prep Time: 30 minutes | Cook Time: 25 minutes | Chill Time: 2 hours | Serves: 8
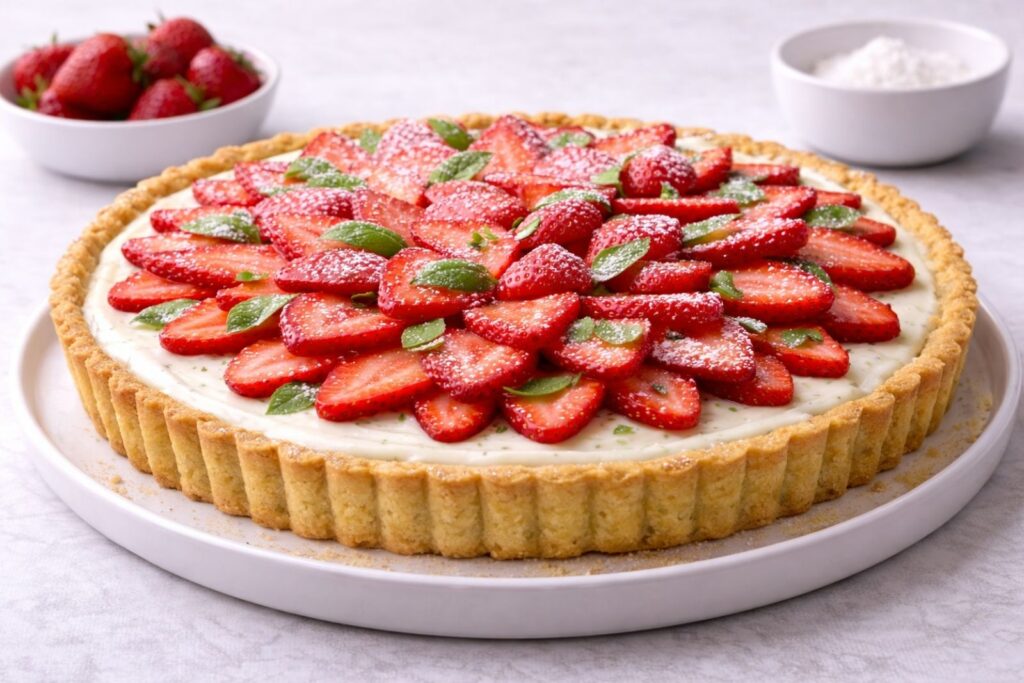
The unexpected pairing of sweet strawberries and fresh basil on a creamy cheese filling creates a tart that is sophisticated, seasonal, and completely irresistible. Strawberries deliver a powerful dose of vitamin C and folate, while fresh basil is rich in antioxidants and essential oils that support immunity and digestion. This tart is proof that herbs belong in desserts, especially when spring is in full swing.
Ingredients:
For the Tart Shell:
- 1¼ cups all-purpose flour
- 2 tablespoons powdered sugar
- ¼ teaspoon sea salt
- ½ cup unsalted butter, cold and cubed
- 2–3 tablespoons ice water
For the Cream Cheese Filling:
- 8 ounces full-fat cream cheese, softened to room temperature
- ⅓ cup powdered sugar, sifted
- 3 tablespoons fresh basil leaves, finely chopped
- 1 teaspoon pure vanilla extract
- 1 teaspoon fresh lemon juice
- 1 teaspoon lemon zest
- ½ cup heavy whipping cream, cold
For the Strawberry Topping:
- 2 cups fresh strawberries, hulled and thinly sliced
- 2 tablespoons granulated sugar
- 1 teaspoon fresh lemon juice
- Optional: small fresh basil leaves and a dusting of powdered sugar for garnish
How to Make It:
- Begin by making the tart shell. In a large bowl, whisk together the flour, powdered sugar, and sea salt. Add the cold cubed butter and use your fingertips to rub it into the flour mixture until it resembles coarse crumbs with pea-sized pieces of butter still visible throughout. Add the ice water one tablespoon at a time, mixing gently after each addition, until the dough just comes together and holds when pressed. Do not overwork it.
- Flatten the dough into a disc, wrap it tightly in plastic wrap, and refrigerate for at least 30 minutes to allow the butter to firm back up and the gluten to relax. This step is essential for a tender, flaky crust that holds its shape beautifully during baking.
- Preheat your oven to 375°F (190°C). On a lightly floured surface, roll the chilled dough out into a circle about 11–12 inches in diameter and ⅛ inch thick. Carefully drape it over a 9-inch tart pan with a removable bottom, pressing it gently into the edges and up the sides. Trim any excess dough flush with the rim. Prick the bottom all over with a fork to prevent puffing.
- Line the tart shell with parchment paper and fill it with pie weights or dried beans. Blind bake for 15 minutes, then carefully remove the parchment and weights. Return the shell to the oven and bake for an additional 8–10 minutes until the crust is golden, dry, and fully cooked through. Remove from the oven and allow it to cool completely on a wire rack before filling.
- While the crust cools, prepare the strawberry topping. In a medium bowl, toss the sliced strawberries with the granulated sugar and fresh lemon juice. Stir gently and set aside for 20–30 minutes, allowing the strawberries to macerate and release their natural juices into a light, glossy syrup.
- In a large bowl, beat the softened cream cheese on medium speed until completely smooth and fluffy, about 2 minutes. Add the powdered sugar, chopped fresh basil, vanilla extract, lemon juice, and lemon zest, and beat on low speed until everything is fully incorporated and the filling is fragrant, smooth, and beautifully flecked with green.
- In a separate chilled bowl, whip the cold heavy whipping cream on medium-high speed until soft, billowy peaks form. Gently fold the whipped cream into the cream cheese mixture in two additions using slow, sweeping motions until the filling is light, airy, and silky smooth.
- Spread the cream cheese filling evenly over the fully cooled tart shell using an offset spatula, smoothing it all the way to the edges for a clean, polished surface. Refrigerate the filled tart for at least 2 hours until the filling is firm and set.
- Just before serving, drain the macerated strawberries of any excess liquid and arrange them over the top of the tart in overlapping concentric circles or in a relaxed, natural pattern — whichever feels most beautiful to you. Scatter a few small fresh basil leaves between the strawberries for a pop of color and an aromatic finish.
- Dust lightly with powdered sugar if desired, then carefully remove the tart from the pan, slice into clean wedges, and serve immediately.
Tip: Don’t add the strawberry topping until you’re ready to serve — the juices will gradually soften the filling if left too long.
12. Lemon Curd Cream Puffs
Prep Time: 30 minutes | Cook Time: 35 minutes | Chill Time: 1 hour | Serves: 10
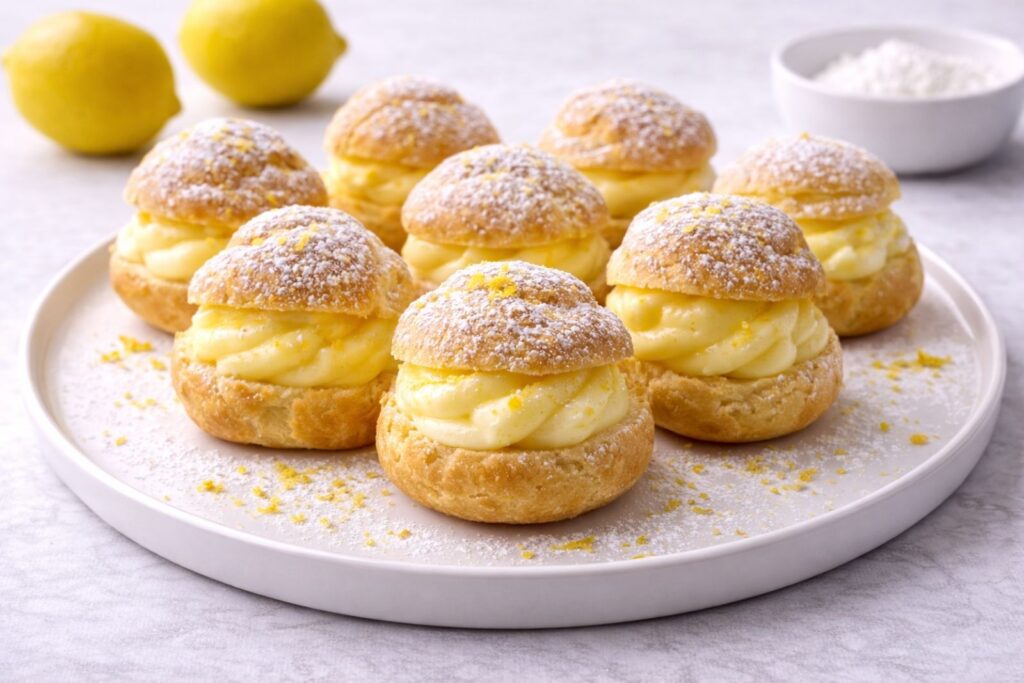
Golden, airy choux pastry filled with bright, tangy lemon curd is a classic French-inspired dessert that shines in the spring season. Lemon curd provides a concentrated hit of vitamin C and the mood-lifting brightness that citrus naturally delivers. These are perfectly portioned, elegant enough for a party spread, and impossible to resist after just one bite.
Ingredients:
For the Choux Pastry:
- 1 cup water
- ½ cup unsalted butter, cubed
- 1 tablespoon granulated sugar
- ¼ teaspoon sea salt
- 1 cup all-purpose flour, sifted
- 4 large eggs, room temperature
For the Lemon Curd Filling:
- 3 large eggs
- 3 large egg yolks
- ¾ cup granulated sugar
- ½ cup fresh lemon juice (about 4 lemons)
- 1 tablespoon lemon zest
- ½ cup unsalted butter, cubed and cold
- 1 pinch of sea salt
For the Whipped Cream Fold-In:
- ¾ cup heavy whipping cream, cold
- 2 tablespoons powdered sugar
- ½ teaspoon pure vanilla extract
For Finishing:
- ½ cup powdered sugar, sifted, for dusting
- Optional: extra lemon zest for garnish
How to Make It:
- Begin with the lemon curd so it has plenty of time to chill before filling. In a medium heatproof bowl, whisk together the eggs, egg yolks, granulated sugar, fresh lemon juice, lemon zest, and sea salt until smooth and well combined. Set the bowl over a saucepan of gently simmering water, making sure the bottom of the bowl does not touch the water.
- Cook the lemon curd mixture, stirring constantly with a heatproof spatula or wooden spoon, for 10–12 minutes until it has thickened enough to coat the back of a spoon and leaves a clear line when you run your finger through it. Remove from heat and add the cold cubed butter a few pieces at a time, stirring until each addition is fully melted and incorporated into a glossy, smooth curd.
- Pour the finished lemon curd through a fine mesh strainer into a clean bowl to remove any cooked egg bits and ensure a perfectly silky texture. Press a sheet of plastic wrap directly onto the surface of the curd to prevent a skin from forming. Refrigerate for at least 1 hour until completely chilled and set.
- Preheat your oven to 400°F (200°C). Line two large baking sheets with parchment paper and set aside. Fit a piping bag with a large round tip.
- To make the choux pastry, combine the water, cubed butter, granulated sugar, and sea salt in a medium saucepan over medium heat. Stir occasionally and bring the mixture to a full rolling boil. Once boiling, add all the sifted flour at once and stir vigorously with a wooden spoon until the dough comes together into a smooth ball and pulls cleanly away from the sides of the pan, about 1–2 minutes. A thin film forming on the bottom of the pan is a good sign — it means the dough is properly dried out.
- Transfer the dough to a large bowl or the bowl of a stand mixer fitted with the paddle attachment. Allow it to cool for 4–5 minutes, stirring occasionally to release steam — it should no longer feel hot to the touch before adding the eggs. Add the eggs one at a time, beating well after each addition until fully incorporated. The finished dough should be smooth, glossy, and fall from a spoon in a slow, thick ribbon.
- Transfer the choux dough to the prepared piping bag and pipe 10 mounds about 1½ inches wide and 1 inch tall onto the lined baking sheets, spacing them at least 2 inches apart to allow for expansion. Wet your fingertip lightly with water and gently smooth down any peaks on top of each mound.
- Bake at 400°F for 20 minutes until the puffs are deeply golden and well risen, then reduce the oven temperature to 350°F (175°C) and bake for an additional 10–12 minutes until completely dry, hollow-sounding when tapped on the bottom, and crisp all the way through. Do not open the oven door during the first 20 minutes — the steam inside is what creates that signature hollow center.
- Remove the puffs from the oven and use a skewer or toothpick to immediately pierce a small hole in the side or bottom of each one to release the trapped steam. Transfer to a wire rack and allow them to cool completely before filling.
- Once the lemon curd is fully chilled, whip the cold heavy cream with the powdered sugar and vanilla extract in a chilled bowl on medium-high speed until soft, fluffy peaks form. Gently fold the whipped cream into the chilled lemon curd in two additions until the filling is light, mousse-like, and perfectly airy.
- Transfer the lemon curd filling into a piping bag fitted with a small round tip. Insert the tip into the hole you pierced in each puff and pipe generously until you feel the puff become slightly heavier and the filling just begins to peek out. Fill every puff fully and evenly for the most satisfying bite.
- Arrange the filled cream puffs on a serving platter and dust generously with sifted powdered sugar just before serving. Finish with a light scattering of fresh lemon zest over the top for a bright, elegant touch.
Tip:
Never fill the cream puffs more than 30 minutes before serving to preserve that irresistible contrast between the crispy shell and cold, creamy filling.
Light & Elegant Finales
These desserts are all about grace, refinement, and that effortless lightness that makes spring dining feel so special. Delicate cookies, airy pavlovas, and refreshing sorbets define this category, offering a gentle ending to any meal. They are designed to impress with minimal heaviness, leaving guests feeling satisfied but never weighed down. Their beautiful presentation makes them as much a feast for the eyes as for the palate.
13. Elderflower Sorbet with Fresh Berries
Prep Time: 15 minutes | Cook Time: 10 minutes | Freeze Time: 6 hours | Serves: 6
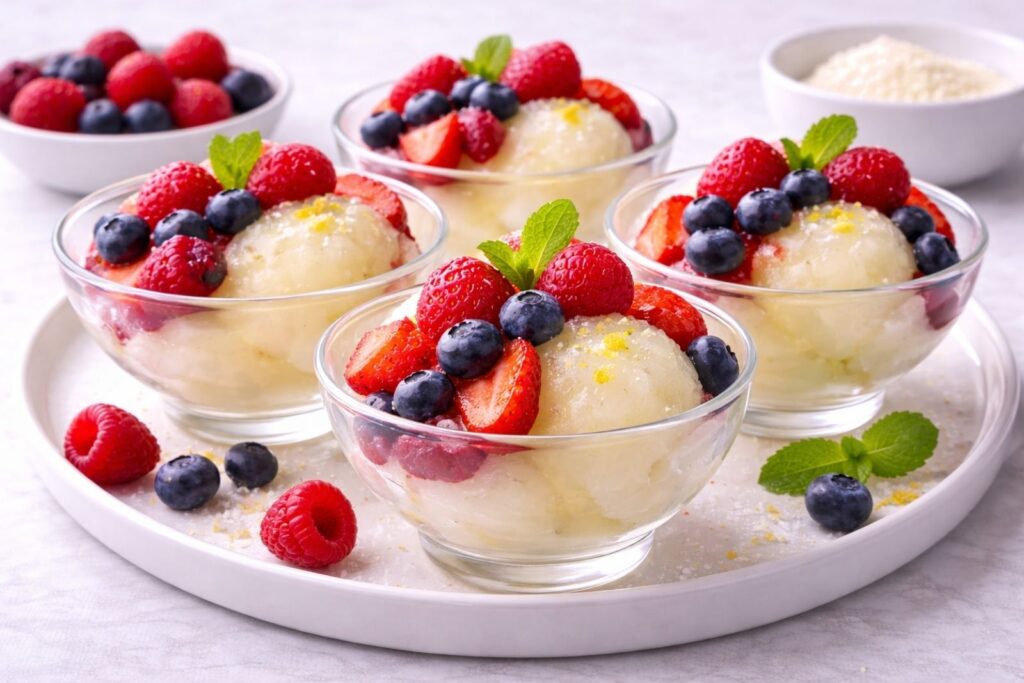
This floral sorbet is one of the most refreshing and elegant ways to end a spring meal, with elderflower’s delicate perfume perfectly complementing vibrant seasonal berries. Elderflower has long been used in herbal traditions for its immune-supporting and anti-inflammatory properties. Being dairy-free and naturally light, it’s a wonderful option for guests with dietary restrictions who still deserve something truly special.
Ingredients:
For the Elderflower Sorbet:
- 2 cups water
- 1 cup granulated sugar
- ½ cup elderflower cordial
- 3 tablespoons fresh lemon juice
- 1 teaspoon lemon zest
- 1 pinch of sea salt
- 1 large egg white, room temperature (for a smoother, lighter texture)
For the Fresh Berry Topping:
- 1 cup fresh strawberries, hulled and quartered
- ½ cup fresh blueberries
- ½ cup fresh raspberries
- 1 tablespoon granulated sugar
- 1 teaspoon fresh lemon juice
- Optional: fresh mint leaves and a light drizzle of elderflower cordial for garnish
How to Make It:
- Begin by making the simple syrup base. In a small saucepan over medium heat, combine the water and granulated sugar. Stir gently and heat until the sugar has completely dissolved and the mixture is clear, about 3–4 minutes. Do not allow it to boil vigorously — a gentle simmer is all that is needed. Remove from heat and allow the syrup to cool completely to room temperature.
- Once the simple syrup is fully cooled, pour it into a large bowl and stir in the elderflower cordial, fresh lemon juice, lemon zest, and sea salt. Taste the mixture and adjust the lemon juice or elderflower cordial to your preference — the flavor should be bright, floral, and beautifully balanced. The mixture will taste slightly more intense than you expect, which is perfectly normal as freezing dulls flavors slightly.
- Pour the elderflower mixture into a shallow, freezer-safe container or baking dish, cover tightly with a lid or plastic wrap, and freeze for 2 hours until the edges are frozen solid but the center is still slushy.
- Scrape the partially frozen mixture thoroughly with a fork, breaking up any ice crystals and stirring the frozen edges into the softer center. Cover and return to the freezer for another 2 hours. Repeat this scraping and stirring process one more time after the second 2-hour freeze for a lighter, fluffier texture. This technique, known as the granita method, creates a beautifully textured sorbet without the need for an ice cream machine.
- Alternatively, if you prefer a smoother, more traditional sorbet texture, beat the room temperature egg white in a clean bowl until soft, foamy peaks form — not stiff, just lightly aerated. After the first 2-hour freeze and fork scraping, transfer the partially frozen mixture to a blender or food processor, add the beaten egg white, and blend until smooth. Pour it back into the container, cover, and freeze for the remaining 4 hours until fully set.
- While the sorbet completes its final freeze, prepare the fresh berry topping. In a medium bowl, gently toss the strawberries, blueberries, and raspberries with the granulated sugar and fresh lemon juice. Stir carefully and set aside for at least 20 minutes to allow the berries to macerate and release their natural juices into a light, jewel-toned syrup.
- When ready to serve, remove the sorbet from the freezer and allow it to sit at room temperature for 3–5 minutes to soften just enough to scoop cleanly. Using a chilled ice cream scoop or large spoon, portion the sorbet into chilled serving bowls or glasses.
- Spoon the macerated fresh berries generously over each serving along with a little of their accumulated syrup. Tuck in a few fresh mint leaves and finish with a light drizzle of elderflower cordial over the top if desired for an extra layer of floral fragrance and elegance.
Tip:
For perfectly rounded scoops, dip your ice cream scoop in warm water and shake off the excess before each scoop.
14. Mint Chocolate Chip Ice Cream
Prep Time: 20 minutes | Cook Time: 15 minutes | Chill Time: 4 hours | Freeze Time: 6 hours | Serves: 8
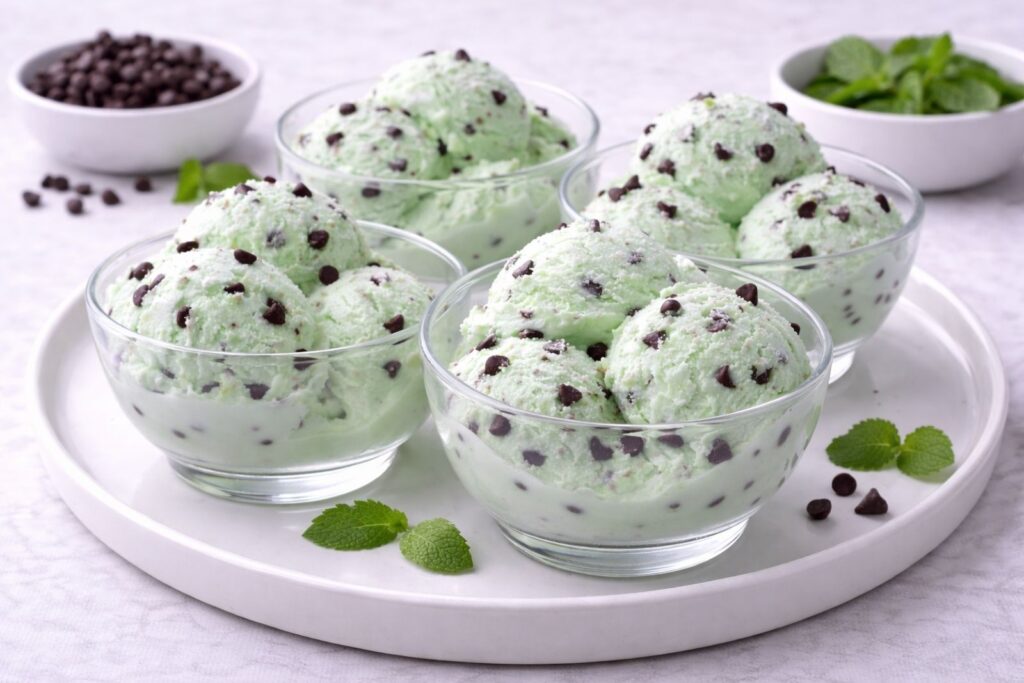
Cool, creamy, and dotted with rich chocolate chips, mint ice cream is a timeless spring classic that never goes out of style. Mint is known for its natural digestive benefits, helping to soothe the stomach and freshen the palate after a meal. The cooling mint flavor feels especially welcome as temperatures begin to rise during the spring season.
Ingredients:
For the Ice Cream Base:
- 2 cups heavy whipping cream, cold and divided
- 1 cup whole milk
- ¾ cup granulated sugar
- 4 large egg yolks, room temperature
- 1 cup fresh mint leaves, firmly packed
- ¼ teaspoon sea salt
- ½ teaspoon pure vanilla extract
For the Chocolate Chips:
- 1 cup semi-sweet mini chocolate chips
- Optional: a few drops of natural green food coloring for a classic mint green color
How to Make It:
- Begin by infusing the cream with fresh mint. In a medium saucepan over medium heat, combine 1 cup of the heavy whipping cream and the whole milk. Add the firmly packed fresh mint leaves and stir gently. Heat the mixture until it just begins to steam and small bubbles form around the edges — do not allow it to boil. Remove from heat, cover with a lid, and allow the mint to steep for 30 minutes so it can fully release its natural oils and cool, aromatic flavor into the cream.
- After steeping, pour the mint-infused cream through a fine mesh strainer into a clean bowl, pressing down firmly on the mint leaves with the back of a spoon to extract every last drop of flavor. Discard the spent mint leaves and return the strained cream to the saucepan.
- In a large bowl, whisk together the egg yolks and granulated sugar on medium speed until the mixture is pale, thick, and ribbony, about 2–3 minutes. Set aside.
- Gently reheat the mint-infused cream over medium-low heat until it is steaming and just beginning to simmer around the edges. Slowly pour the warm cream into the egg yolk mixture in a thin, steady stream, whisking constantly as you pour to temper the eggs gradually without scrambling them.
- Pour the tempered mixture back into the saucepan and cook over medium-low heat, stirring constantly with a heatproof spatula, until the custard has thickened enough to coat the back of a spoon and registers 170–175°F (77–79°C) on an instant-read thermometer, about 8–10 minutes. Run your finger across the back of the spoon — if the line holds cleanly, the custard is ready.
- Remove the custard from the heat and pour it through a fine mesh strainer into a large clean bowl. Stir in the sea salt, vanilla extract, and the remaining 1 cup of cold heavy whipping cream. If using natural green food coloring, add a drop or two now and stir until evenly distributed throughout the custard for that classic mint green hue.
- Press a sheet of plastic wrap directly onto the surface of the custard to prevent a skin from forming. Refrigerate for at least 4 hours or overnight until the custard is completely and thoroughly chilled — this step is essential for the creamiest possible ice cream.
- Once fully chilled, churn the custard in your ice cream machine according to the manufacturer’s instructions until it reaches a thick, soft-serve consistency, typically 20–25 minutes. The ice cream should look pale, creamy, and significantly increased in volume from the air incorporated during churning.
- In the last 2 minutes of churning, add the mini chocolate chips gradually through the opening of the machine so they distribute evenly throughout the ice cream without sinking to the bottom.
- Transfer the freshly churned ice cream into a freezer-safe container and smooth the top evenly with a spatula. Press a sheet of parchment paper directly onto the surface to prevent ice crystals from forming. Seal tightly with a lid and freeze for at least 6 hours or overnight until completely firm and perfectly scoopable.
- Remove the ice cream from the freezer 5 minutes before serving to allow it to soften just slightly for the cleanest, most effortless scoops. Serve in chilled bowls or waffle cones and enjoy immediately.
Tip:
Using fresh mint leaves instead of extract makes an extraordinary difference — the result is a naturally cool, nuanced flavor no store-bought pint can match.
15. Peach Melba Pavlova
Prep Time: 30 minutes | Cook Time: 1 hour 15 minutes | Cooling Time: 2 hours | Serves: 10
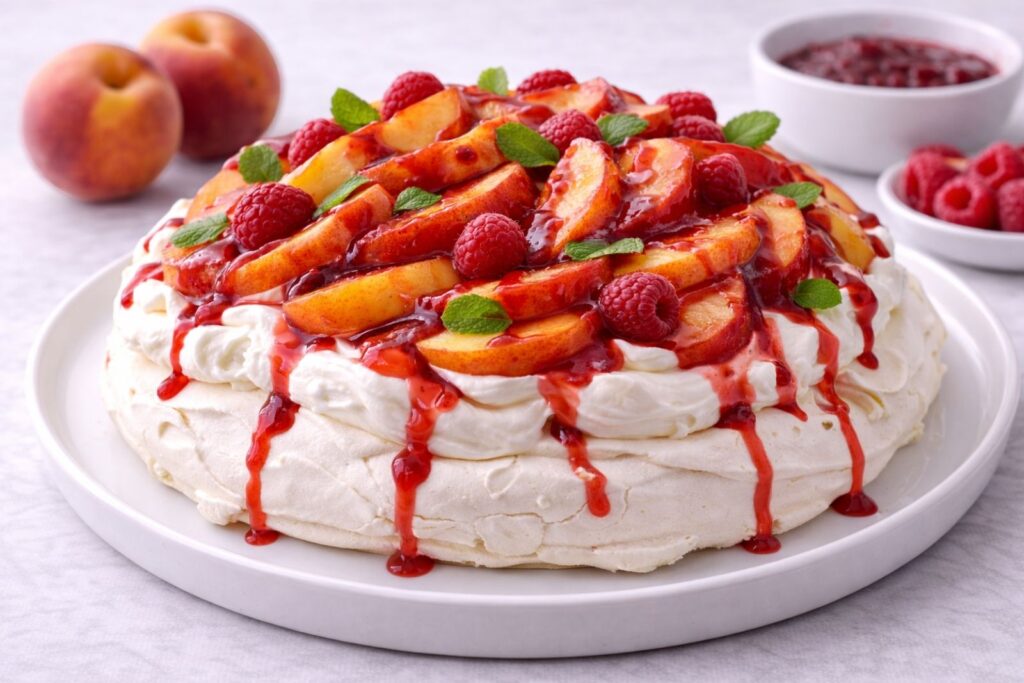
A cloud of crisp meringue topped with whipped cream, fresh peaches, and raspberry sauce, this pavlova is one of spring’s most showstopping desserts. Peaches are rich in vitamins A and C, which support skin health and immune function, making this gorgeous dessert as beneficial as it is beautiful. The light meringue base keeps it from feeling heavy, so it’s a wonderful finale for any spring gathering.
Ingredients:
For the Meringue Base:
- 6 large egg whites, room temperature
- 1½ cups superfine sugar
- 2 teaspoons cornstarch
- 1 teaspoon white wine vinegar
- 1 teaspoon pure vanilla extract
- 1 pinch of sea salt
For the Whipped Cream:
- 2 cups heavy whipping cream, cold
- 3 tablespoons powdered sugar, sifted
- 1 teaspoon pure vanilla extract
For the Raspberry Sauce:
- 1½ cups fresh raspberries
- 3 tablespoons granulated sugar
- 1 tablespoon fresh lemon juice
For the Peach Topping:
- 3 large ripe peaches, pitted and thinly sliced
- 1 tablespoon granulated sugar
- 1 teaspoon fresh lemon juice
- Optional: fresh mint leaves and whole raspberries for garnish
How to Make It:
- Preheat your oven to 275°F (135°C). Line a large baking sheet with parchment paper. Using a 9-inch round cake pan or plate as a guide, trace a circle onto the parchment paper with a pencil, then flip the paper over so the pencil marks face down. This will serve as your guide for shaping the meringue perfectly.
- In a completely clean, grease-free large bowl or the bowl of a stand mixer fitted with the whisk attachment, beat the egg whites and sea salt on medium speed until soft, foamy peaks form. Increase the speed to medium-high and begin adding the superfine sugar one tablespoon at a time, waiting about 20 seconds between each addition. This slow, gradual process is essential — rushing the sugar in will deflate the meringue and prevent it from reaching its full glossy, voluminous potential.
- Once all the sugar has been incorporated, continue beating on high speed for 4–5 minutes until the meringue is very thick, brilliantly glossy, and holds stiff, firm peaks. Rub a small amount between your fingers — if it feels completely smooth with no graininess, all the sugar has fully dissolved and the meringue is ready. If it still feels gritty, continue beating for another minute or two.
- Sprinkle the cornstarch, white wine vinegar, and vanilla extract over the meringue and fold them gently using a large spatula with just a few careful folds. These additions are what give pavlova its signature crisp outer shell and soft, marshmallowy interior — do not skip them.
- Spoon the meringue onto the prepared parchment within the traced circle. Use an offset spatula or the back of a large spoon to shape it into a round, building up the sides slightly higher than the center to create a natural well that will cradle the toppings beautifully once filled.
- Place the baking sheet in the oven and immediately reduce the temperature to 250°F (120°C). Bake for 1 hour and 15 minutes until the outside of the meringue is dry, crisp, and very lightly cream-colored. It should lift cleanly from the parchment paper when gently tested at the edges. Do not open the oven door during baking.
- Once the baking time is complete, turn off the oven and leave the pavlova inside with the door closed for at least 2 hours or until the oven has cooled completely. This slow, gradual cooling prevents the meringue from cracking dramatically from a sudden temperature change. The pavlova can safely remain in the turned-off oven overnight if needed.
- While the pavlova cools, prepare the raspberry sauce. In a small saucepan over medium-low heat, combine the raspberries, granulated sugar, and fresh lemon juice. Cook for 5–6 minutes, stirring occasionally, until the raspberries have completely broken down and the sauce has thickened into a rich, jewel-toned consistency. Strain through a fine mesh strainer into a clean bowl to remove the seeds, pressing firmly on the solids. Allow the sauce to cool completely to room temperature, then refrigerate until needed.
- Toss the sliced peaches gently with the granulated sugar and fresh lemon juice in a medium bowl. Set aside for 15–20 minutes to macerate until they are glossy, lightly syrupy, and deeply fragrant.
- When ready to assemble, whip the cold heavy cream with the powdered sugar and vanilla extract in a chilled bowl on medium-high speed until soft, billowy peaks form. Do not overwhip — the cream should be luscious and cloud-like, not stiff or grainy.
- Carefully transfer the cooled pavlova to a large serving platter or cake stand. Spoon the whipped cream generously over the top, spreading it softly into the natural well of the meringue and letting it spill slightly over the edges for a beautifully abundant, effortless look.
- Arrange the macerated peach slices over the whipped cream in an overlapping, flowing pattern. Drizzle the raspberry sauce in a generous, elegant stream over the peaches and cream, allowing it to pool naturally into the crevices. Scatter a few whole raspberries and fresh mint leaves over the top for a final flourish of color and fragrance. Serve immediately once assembled.
Tip:
Make sure your bowl and whisk are completely grease-free before beating the egg whites — wipe them down with a little white vinegar on a paper towel for guaranteed results.
16. Lemon Thyme Sugar Cookies
Prep Time: 20 minutes | Cook Time: 12 minutes | Chill Time: 30 minutes | Serves: 24 cookies

These buttery, herb-kissed cookies are a delightful twist on a classic, with fresh thyme adding an unexpected savory note that perfectly balances the bright lemon. Thyme is rich in vitamins C and A and contains compounds known to support respiratory and immune health. Their simple elegance makes them ideal for spring garden parties, afternoon tea, or homemade gift boxes.
Ingredients:
- 2 ¾ cups all-purpose flour
- 1 teaspoon baking soda
- ½ teaspoon baking powder
- ¼ teaspoon sea salt
- 1 cup unsalted butter, softened to room temperature
- 1 ½ cups granulated sugar, plus extra for rolling
- 1 large egg, room temperature
- 1 egg yolk, room temperature
- 2 tablespoons fresh lemon juice
- 1 tablespoon lemon zest (about 2 lemons)
- 1 tablespoon fresh thyme leaves, finely chopped
- 1 teaspoon pure vanilla extract
- Optional: a few fresh thyme sprigs and thin lemon slices for garnish
How to Make It:
- In a medium bowl, whisk together the flour, baking soda, baking powder, and sea salt. Set aside.
- In a large bowl, beat the softened butter and granulated sugar together on medium speed for 3–4 minutes until the mixture is light, pale, and fluffy. Scrape down the sides of the bowl as needed.
- Add the egg and egg yolk one at a time, beating well after each addition. Mix in the lemon juice, lemon zest, chopped thyme, and vanilla extract until everything is fragrant and evenly combined.
- Reduce the mixer to low speed and gradually add the flour mixture, mixing just until a soft dough forms. Do not overmix. The dough will be slightly tacky and beautifully fragrant.
- Cover the bowl with plastic wrap and refrigerate the dough for at least 30 minutes. Chilling the dough prevents the cookies from spreading too thin and intensifies the lemon and thyme flavors.
- Preheat your oven to 375°F (190°C). Line two large baking sheets with parchment paper and set aside. Pour a small amount of granulated sugar into a shallow bowl for rolling.
- Scoop the chilled dough into 1 ½-tablespoon portions and roll each one into a smooth ball between your palms. Roll each ball generously in the sugar until fully coated, then place them about 2 inches apart on the prepared baking sheets.
- Bake for 10–13 minutes until the edges are just set and the tops look slightly underdone — they will continue to firm up on the pan. The centers should look soft and pale while the bottoms are just lightly golden.
- Remove from the oven and allow the cookies to cool on the baking sheet for 5 minutes before transferring to a wire rack. They will flatten slightly and develop the most gorgeous crinkled tops as they cool.
Tip:
For the best texture and flavor, never skip chilling the dough — and always use fresh lemon juice, never bottled, for the brightest citrus taste.
17. Raspberry Rosewater Macarons Delicate
Prep Time: 45 minutes | Rest Time: 30 minutes | Cook Time: 14 minutes | Serves: 20 macarons

French macarons filled with raspberry and rosewater buttercream are the very definition of spring sophistication and confectionery artistry. Raspberries provide a generous dose of antioxidants and fiber, while rose has been used in wellness traditions for its mood-lifting and skin-nourishing properties. These beautiful pastel shells make a stunning addition to afternoon tea spreads, spring parties, or any warm-weather gathering.
Ingredients:
For the Macaron Shells:
- 1¾ cups powdered sugar, sifted
- 1 cup super-fine almond flour, sifted
- 3 large egg whites, aged at room temperature for 24 hours
- ¼ cup superfine sugar
- 1 teaspoon fresh lemon juice
- ½ teaspoon pure vanilla extract
- A few drops of pink or rose gel food coloring
- 1 pinch of sea salt
For the Raspberry Rosewater Buttercream:
- ½ cup unsalted butter, softened to room temperature
- 1½ cups powdered sugar, sifted
- 3 tablespoons fresh raspberry puree, strained of seeds
- 1 teaspoon rosewater
- ½ teaspoon pure vanilla extract
- 1 pinch of sea salt
- Optional: a few drops of pink gel food coloring for a deeper blush tone
How to Make It:
- At least 24 hours before baking, separate your egg whites and leave them uncovered in a clean bowl at room temperature. Aging the egg whites allows excess moisture to evaporate, resulting in a more stable meringue and smoother macaron shells.
- Line two large baking sheets with parchment paper. Using a 1½-inch round cookie cutter or glass, trace circles onto the parchment spaced about 1 inch apart, then flip the paper over so the pencil marks face down. Fit a large piping bag with a round tip and set aside.
- Sift the almond flour and powdered sugar together through a fine mesh strainer into a large bowl, discarding any large almond pieces that don’t pass through. This step is non-negotiable for smooth, flawless shells — do not skip it.
- In a completely clean, grease-free bowl, beat the aged egg whites with the sea salt and lemon juice on medium speed until soft, foamy peaks form. Increase the speed to medium-high and begin adding the superfine sugar one tablespoon at a time, waiting 20 seconds between each addition. Continue beating until the meringue is thick, brilliantly glossy, and holds stiff, firm peaks. Add the vanilla extract and gel food coloring and beat for just a few more seconds until evenly distributed.
- Add the sifted almond flour mixture to the meringue all at once. Using a large spatula, begin folding the batter using the macaronage technique — press and fold the batter against the side of the bowl, rotating as you go. Continue folding until the batter flows like slow-moving lava and falls off the spatula in a thick, continuous ribbon. When you lift the spatula and the ribbon dissolves back into the batter within 10 seconds, it is ready. This typically takes 40–50 folds — do not overmix or undermix.
- Transfer the batter to the prepared piping bag and pipe rounds onto the traced circles on the parchment-lined baking sheets, holding the bag straight up and applying even pressure. Once all rounds are piped, firmly tap each baking sheet flat against the counter 4–5 times to release any trapped air bubbles. Use a toothpick to pop any remaining bubbles visible on the surface.
- Allow the piped shells to rest at room temperature for 30–60 minutes until they are completely dry and matte to the touch — a light skin should have formed on the surface so that they no longer stick to your fingertip when gently touched. This resting period is what creates the signature macaron “foot” during baking.
- Preheat your oven to 300°F (150°C). Bake one tray at a time on the center rack for 13–15 minutes. The macarons are ready when they have developed visible feet, are set on top, and slide cleanly off the parchment when gently nudged. Do not overbake or they will dry out completely and lose their chewy interior.
- Remove from the oven and allow the shells to cool completely on the baking sheet before attempting to remove them — at least 20 minutes. Trying to peel them off while warm will cause them to stick and tear.
- While the shells cool, make the buttercream. To prepare the raspberry puree, blend fresh raspberries until smooth and press through a fine mesh strainer to remove all seeds. Measure out 3 tablespoons of the strained puree and set aside.
- Beat the softened butter on medium speed until pale and fluffy, about 2–3 minutes. Add the sifted powdered sugar in two additions, beating well after each. Add the raspberry puree, rosewater, vanilla extract, and sea salt and beat on medium-high speed until the buttercream is smooth, silky, and beautifully blush-toned. If it is too soft, refrigerate for 10 minutes before piping.
- Match the cooled shells into pairs by size. Transfer the buttercream to a piping bag and pipe a generous round onto the flat side of one shell in each pair, leaving a small border around the edge. Gently press the matching shell on top and twist slightly to spread the filling evenly to the edges without squeezing it out.
- Place the assembled macarons in an airtight container and refrigerate for at least 24 hours before serving. This maturation period is the secret to achieving the perfect macaron texture — the filling softens the shells from the inside, creating that iconic crispy exterior with a tender, chewy, melt-in-your-mouth center.
Tip:
Avoid making macarons on rainy or humid days — excess moisture in the air will prevent the shells from forming their skin properly and can cause cracking during baking.
18. Orange Blossom Madeleines
Prep Time: 15 minutes | Chill Time: 1 hour | Cook Time: 12 minutes | Serves: 24 madeleines

These shell-shaped French cakes are infused with fragrant orange blossom water for a delicate, floral bite that is gentle, elegant, and utterly charming. Orange blossom is known for its calming, anxiety-reducing properties and adds a beautiful depth of flavor without any heaviness. Perfectly paired with afternoon tea or coffee, they bring a touch of spring elegance to any occasion.
Ingredients:
- 1 cup all-purpose flour
- 1 teaspoon baking powder
- ¼ teaspoon sea salt
- ½ cup unsalted butter, melted and cooled, plus extra for greasing the pan
- ¾ cup granulated sugar
- 3 large eggs, room temperature
- 2 tablespoons orange blossom water
- 1 tablespoon fresh orange zest
- 1 tablespoon fresh orange juice
- 1 teaspoon pure vanilla extract
- Optional: powdered sugar for dusting and a few thin strips of candied orange peel for garnish
How to Make It:
- In a medium bowl, whisk together the flour, baking powder, and sea salt until evenly combined. Set aside.
- In a large bowl, whisk the eggs and granulated sugar together vigorously for 2–3 minutes until the mixture is pale, slightly thickened, and ribbony. The eggs should nearly double in volume — this step is what gives madeleines their signature light, airy crumb.
- Add the orange blossom water, fresh orange zest, orange juice, and vanilla extract to the egg mixture and whisk until fragrant and evenly blended.
- Gently fold the dry ingredients into the wet ingredients using a spatula, stirring just until no streaks of flour remain. Do not overmix — a light hand here is essential for a tender crumb.
- Pour the cooled melted butter in a slow, steady stream along the side of the bowl and fold it in gently until fully incorporated and the batter is smooth, glossy, and beautifully uniform.
- Cover the bowl tightly with plastic wrap and refrigerate the batter for at least 1 hour or up to overnight. Chilling is the most important step in madeleine baking — the cold batter hitting the hot pan creates that iconic domed hump that makes a true madeleine.
- When ready to bake, preheat your oven to 400°F (200°C). Generously brush each cavity of a madeleine pan with melted butter, making sure to coat every ridge of the shell pattern. Dust lightly with flour and tap out any excess. Place the prepared pan in the freezer for 5 minutes while you prepare to bake — a cold, well-greased pan ensures the madeleines release cleanly and develop beautiful definition in the shell pattern.
- Spoon the chilled batter into the prepared madeleine pan, filling each cavity about three-quarters full. Do not spread or flatten the batter — it will settle and fill the molds on its own during baking.
- Bake for 11–13 minutes until the edges are golden, the tops are set, and the characteristic dome has risen beautifully in the center of each madeleine. They should spring back lightly when touched and pull slightly away from the edges of the pan.
- Remove from the oven and immediately invert the pan over a wire rack, tapping firmly to release the madeleines. They should fall out cleanly with the shell pattern facing upward. Allow them to cool for 5 minutes.
- Dust generously with powdered sugar just before serving and finish with a few delicate strips of candied orange peel if desired. Madeleines are best enjoyed warm or within a few hours of baking, when their edges are still slightly crisp and their centers remain soft and tender.
Tip: Never skip chilling the batter — it’s the secret to that beautiful, signature dome. For the best results, chill overnight and bake straight from the refrigerator for the most dramatic rise.
Indulgent Spring Sweets
This final category is for those moments when only something truly decadent will do. These are the generous, soul-warming desserts that invite seconds and linger in memory long after the last bite. They lean into rich textures and bold flavors while still incorporating spring-friendly ingredients like carrots, citrus, and fresh fruit. Whether for a warm-weather gathering or a weekend baking project, these recipes deliver maximum comfort and joy.
19. Carrot Cake with Cream Cheese Frosting
Prep Time: 25 minutes | Cook Time: 35 minutes | Serves: 16
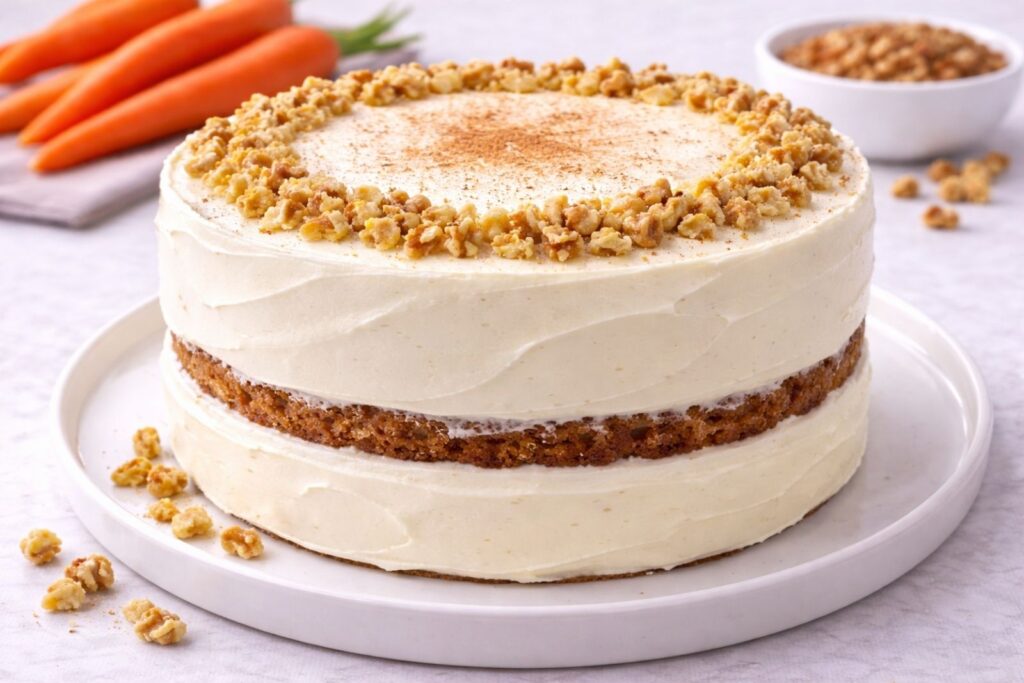
A beloved spring classic, this moist, warmly spiced carrot cake topped with tangy cream cheese frosting is a timeless crowd-pleaser for spring gatherings and beyond. Carrots are an excellent source of beta-carotene, which the body converts to vitamin A to support vision, immunity, and skin health. The combination of warming spices like cinnamon and nutmeg also has natural anti-inflammatory properties that make this cake feel as nourishing as it is indulgent.
Ingredients:
For the Carrot Cake:
- 2 cups all-purpose flour
- 2 teaspoons baking powder
- 1 teaspoon baking soda
- 2 teaspoons ground cinnamon
- ½ teaspoon ground nutmeg
- ¼ teaspoon ground ginger
- ¼ teaspoon sea salt
- 4 large eggs, room temperature
- 1½ cups granulated sugar
- ¼ cup packed light brown sugar
- 1 cup neutral oil such as vegetable or avocado oil
- 2 teaspoons pure vanilla extract
- 3 cups freshly grated carrots, loosely packed (about 5 medium carrots)
- ½ cup crushed pineapple, well drained
- ½ cup chopped walnuts or pecans, optional
For the Cream Cheese Frosting:
- 16 ounces full-fat cream cheese, softened to room temperature
- ½ cup unsalted butter, softened to room temperature
- 3½ cups powdered sugar, sifted
- 2 teaspoons pure vanilla extract
- 1 pinch of sea salt
- Optional: chopped walnuts, pecans, or a light dusting of cinnamon for garnish
How to Make It:
- Preheat your oven to 350°F (175°C). Grease two 9-inch round cake pans and line the bottoms with parchment paper. Set aside.
- In a large bowl, whisk together the flour, baking powder, baking soda, cinnamon, nutmeg, ginger, and sea salt until evenly combined. Set aside.
- In a separate large bowl, whisk together the eggs, granulated sugar, and brown sugar until well combined and slightly pale. Add the oil and vanilla extract and whisk until the mixture is smooth, glossy, and fully emulsified.
- Fold the dry ingredients into the wet ingredients using a spatula, stirring just until no streaks of flour remain. The batter will be thick — that is perfectly normal.
- Add the freshly grated carrots and drained crushed pineapple to the batter and fold gently until evenly distributed throughout. If using, fold in the chopped walnuts or pecans. The pineapple adds incredible moisture and a subtle natural sweetness without making the cake taste tropical.
- Divide the batter evenly between the two prepared cake pans and smooth the tops with a spatula. Tap each pan gently on the counter a couple of times to release any air bubbles.
- Bake for 32–38 minutes until a toothpick inserted into the center of each layer comes out clean or with just a few moist crumbs. The tops should be set and the edges should have pulled slightly away from the sides of the pans.
- Allow the cakes to cool in their pans for 15 minutes before turning them out onto a wire rack. Peel away the parchment paper and allow both layers to cool completely to room temperature before frosting — frosting a warm cake will cause the cream cheese frosting to melt and slide.
- While the cakes cool, prepare the cream cheese frosting. Beat the softened cream cheese and butter together on medium speed for 3–4 minutes until completely smooth, light, and fluffy with no lumps remaining. Scrape down the sides of the bowl as needed.
- Add the sifted powdered sugar in two additions, beating on low speed after each until incorporated, then increase to medium-high and beat until the frosting is silky, thick, and holds its shape beautifully. Add the vanilla extract and sea salt and beat for one final minute until everything is evenly blended and the frosting is perfectly smooth.
- Place one completely cooled cake layer on a serving plate or cake stand. Spread a generous, even layer of cream cheese frosting over the top using an offset spatula. Place the second cake layer on top, pressing down gently to level it.
- Spread the remaining frosting over the top and sides of the cake, smoothing it as neatly or as rustically as you like. Finish with a scattering of chopped walnuts or pecans around the top edge, or a delicate dusting of ground cinnamon for a simple, beautiful finish.
Tip:
Always grate your carrots fresh — pre-shredded carrots from the bag are too dry and coarse to give you that perfectly moist, tender crumb that makes a truly great carrot cake.
20. Lemon Blueberry Bread Pudding
Prep Time: 20 minutes | Rest Time: 30 minutes | Cook Time: 45 minutes | Serves: 12
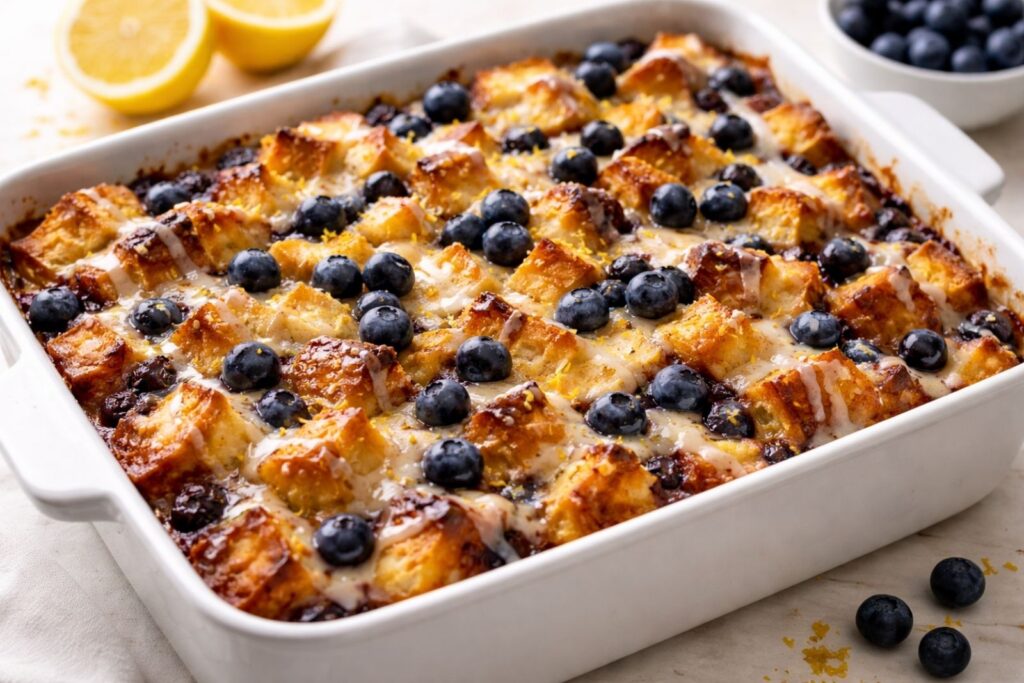
This comforting baked pudding transforms simple bread into a custardy, fruit-studded dessert that is warm, satisfying, and full of spring flavor. Blueberries are rich in antioxidants and vitamin C, while lemon adds a bright, immune-boosting zing that lifts the entire dish. It’s a wonderful make-ahead dessert that tastes even better the next day, making it ideal for spring entertaining.
Ingredients:
For the Bread Pudding:
- 1 loaf day-old brioche or challah bread, cut into 1-inch cubes (about 10 cups)
- 2 cups fresh blueberries
- 3 cups whole milk
- 1 cup heavy cream
- 5 large eggs, room temperature
- ¾ cup granulated sugar
- 2 tablespoons fresh lemon juice
- 1 tablespoon lemon zest
- 2 teaspoons pure vanilla extract
- ½ teaspoon ground cinnamon
- ¼ teaspoon sea salt
- 2 tablespoons unsalted butter, cut into small pieces for dotting the top
For the Lemon Glaze:
- 1 cup powdered sugar, sifted
- 3 tablespoons fresh lemon juice
- 1 teaspoon lemon zest
- Optional: extra fresh blueberries and lemon zest for garnish
How to Make It:
- If your bread is fresh, spread the cubed pieces in a single layer on a baking sheet and leave them out uncovered for several hours or overnight to dry out slightly. Stale, dry bread absorbs the custard far more effectively than fresh bread and gives the pudding its signature custardy, tender texture.
- Grease a 9×13-inch baking dish generously with butter. Spread half of the bread cubes evenly across the bottom of the dish. Scatter 1 cup of the fresh blueberries over the bread, then layer the remaining bread cubes on top. Scatter the remaining cup of blueberries over the surface, tucking some down between the bread cubes for blueberry flavor in every bite.
- In a large bowl, whisk together the whole milk, heavy cream, eggs, granulated sugar, fresh lemon juice, lemon zest, vanilla extract, cinnamon, and sea salt until completely smooth and well combined. The custard should be fragrant, pale, and beautifully unified.
- Pour the custard mixture slowly and evenly over the bread and blueberries, making sure every piece of bread is thoroughly saturated. Use the back of a spoon or your hands to gently press the bread down into the custard so it absorbs fully. Dot the small pieces of butter evenly over the top surface.
- Cover the baking dish tightly with plastic wrap and allow the bread pudding to rest at room temperature for 30 minutes, or refrigerate it overnight for the most deeply flavored, perfectly custardy result. The longer the bread soaks, the better every bite will be.
- When ready to bake, preheat your oven to 350°F (175°C). Remove the plastic wrap and bake uncovered for 42–48 minutes until the top is golden brown, the edges are set, and the center has a very slight jiggle when the dish is gently nudged. The pudding will continue to firm up as it rests out of the oven.
- Remove from the oven and allow the bread pudding to cool for at least 15 minutes before glazing and serving — this resting time allows the custard to fully set and makes slicing much cleaner and easier.
- While the pudding rests, whisk together the sifted powdered sugar, fresh lemon juice, and lemon zest in a small bowl until the glaze is smooth, glossy, and pourable. If it is too thick, add a few drops of lemon juice to loosen it. If too thin, add a little more powdered sugar.
- Drizzle the lemon glaze generously over the warm bread pudding in a slow, even stream, allowing it to soak into the top layer and pool beautifully around the edges. Scatter a handful of fresh blueberries and a pinch of lemon zest over the top for a fresh, vibrant finish.
- Serve warm directly from the baking dish, scooping generous portions into bowls. For an extra indulgent touch, serve alongside a scoop of vanilla ice cream or a dollop of lightly sweetened whipped cream.
Tip:
Always use day-old or slightly stale bread — fresh bread will turn mushy rather than custardy. Brioche and challah are the gold standard for bread pudding thanks to their rich, buttery crumb that soaks up the custard beautifully without falling apart.
21. Strawberry Tiramisu
Prep Time: 30 minutes | Chill Time: 4 hours | Serves: 12
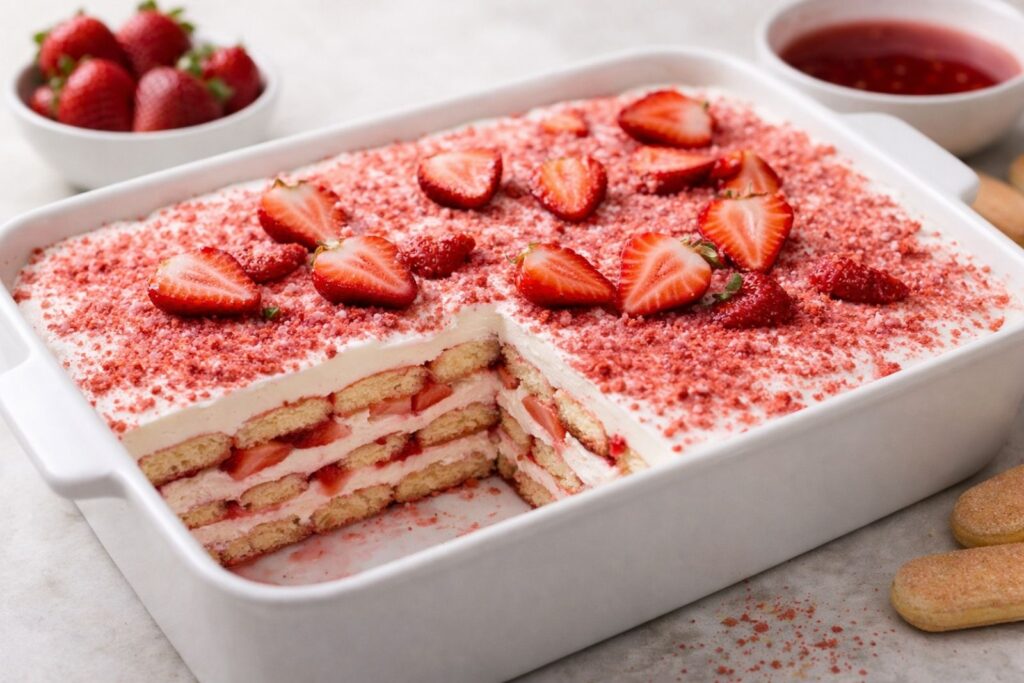
This gorgeous Italian-inspired dessert swaps the traditional coffee for fresh strawberry flavor, creating a lighter, more spring-appropriate version of a beloved classic. Strawberries add vitamin C, folate, and natural sweetness while reducing the heaviness often associated with traditional tiramisu. Layered and chilled, it’s a stunning no-bake dessert that feels effortlessly luxurious for any spring occasion.
Ingredients:
For the Strawberry Soaking Syrup:
- 2 cups fresh strawberries, hulled and quartered
- ¼ cup granulated sugar
- ½ cup water
- 1 tablespoon fresh lemon juice
- 1 teaspoon pure vanilla extract
For the Mascarpone Cream:
- 16 ounces full-fat mascarpone cheese, cold
- 1½ cups heavy whipping cream, cold
- ½ cup powdered sugar, sifted
- 1 teaspoon pure vanilla extract
- 1 pinch of sea salt
For the Layers:
- 24–28 ladyfinger biscuits
- 2 cups fresh strawberries, hulled and thinly sliced
- Optional: freeze-dried strawberry powder or finely crushed freeze-dried strawberries for dusting the top
How to Make It:
- Begin by making the strawberry soaking syrup. In a small saucepan over medium heat, combine the quartered strawberries, granulated sugar, water, and fresh lemon juice. Stir gently and cook for 8–10 minutes until the strawberries have completely broken down and the syrup is deep red, fragrant, and slightly thickened. Remove from heat and stir in the vanilla extract.
- Pour the strawberry syrup through a fine mesh strainer into a shallow bowl, pressing firmly on the solids to extract every drop of flavor. Discard the pulp and allow the syrup to cool completely to room temperature before using — dipping ladyfingers into warm syrup will make them dissolve rather than absorb properly.
- While the syrup cools, prepare the mascarpone cream. In a large chilled bowl, beat the cold mascarpone cheese on medium speed until smooth and creamy, about 1 minute. Add the cold heavy whipping cream, sifted powdered sugar, vanilla extract, and sea salt.
- Beat on medium-high speed until the mixture is thick, silky, and holds soft, billowy peaks — about 2–3 minutes. Be careful not to overbeat, as mascarpone cream can become grainy and stiff very quickly. The finished cream should be luscious, cloud-like, and hold its shape when spooned.
- Working quickly one at a time, dip each ladyfinger into the cooled strawberry syrup for just 1–2 seconds per side. You want them well moistened but not soggy — they should still hold their shape when lifted. Arrange the dipped ladyfingers in a single, snug layer across the bottom of a 9×13-inch dish.
- Spread half of the mascarpone cream evenly over the ladyfinger layer using an offset spatula, smoothing it all the way to the edges for clean, defined layers. Arrange the thinly sliced fresh strawberries in an even layer over the cream, covering the surface generously.
- Repeat with a second layer of dipped ladyfingers, arranging them snugly over the strawberries. Spread the remaining mascarpone cream evenly over the top, smoothing it into a clean, polished surface.
- Cover the dish tightly with plastic wrap and refrigerate for at least 4 hours, or overnight for the best possible result. The chilling time allows the ladyfingers to fully soften into a cake-like texture and the layers to meld together into one beautifully unified dessert.
- Just before serving, dust the top generously with freeze-dried strawberry powder or finely crushed freeze-dried strawberries for a stunning deep pink finish and an extra burst of concentrated strawberry flavor. Alternatively, arrange a few fresh strawberry slices decoratively over the top for a simple, elegant presentation.
- Slice into clean squares using a sharp knife, wiping the blade between each cut for the neatest, most beautiful layers. Serve chilled directly from the dish.
Tip:
Don’t rush the chilling time — a minimum of 4 hours is good, but overnight is when the flavors fully develop and the texture becomes perfectly soft and balanced. The longer it chills, the more the layers meld and the ladyfingers transform into that perfectly soft, cake-like texture that makes every bite irresistible.
22. Honey Ricotta Cheesecake with Fig Compote
Prep Time: 25 minutes | Cook Time: 55 minutes | Chill Time: 4 hours | Serves: 10
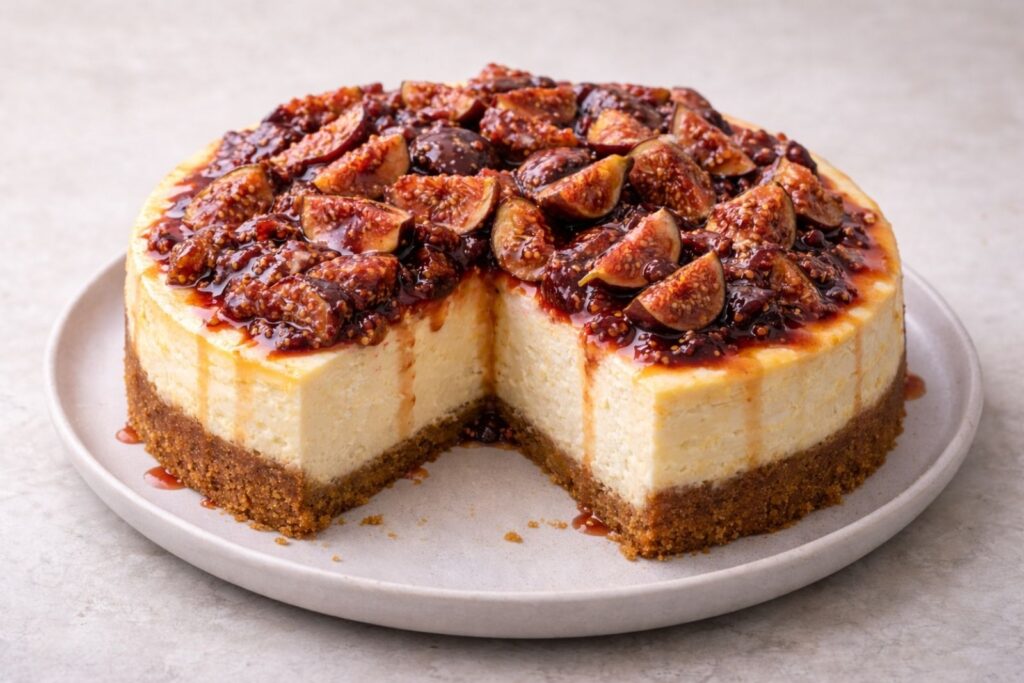
This refined cheesecake combines the creamy richness of ricotta with the natural sweetness of honey, crowned with a luscious warm fig compote. Ricotta provides high-quality protein and calcium, while honey delivers antioxidants and a natural sweetness that makes this dessert feel more wholesome than traditional cheesecakes. Figs are a wonderful source of fiber and minerals, adding both nutritional depth and a sophisticated, seasonal finishing touch.
Ingredients:
For the Crust:
- 1½ cups graham cracker crumbs
- 3 tablespoons granulated sugar
- ¼ teaspoon ground cinnamon
- 5 tablespoons unsalted butter, melted
For the Honey Ricotta Filling:
- 2 cups whole milk ricotta cheese, drained overnight through a fine mesh strainer
- 16 ounces full-fat cream cheese, softened to room temperature
- ½ cup raw honey
- ¼ cup granulated sugar
- 3 large eggs, room temperature
- 2 teaspoons pure vanilla extract
- 1 tablespoon fresh lemon juice
- 1 teaspoon lemon zest
- 2 tablespoons all-purpose flour
- 1 pinch of sea salt
For the Fig Compote:
- 1½ cups fresh or dried figs, stems removed and quartered
- 3 tablespoons raw honey
- 2 tablespoons water
- 1 tablespoon fresh lemon juice
- ½ teaspoon pure vanilla extract
- 1 pinch of sea salt
- Optional: a few fresh thyme sprigs for a subtle herbal note
How to Make It:
- The night before baking, drain the ricotta by placing it in a fine mesh strainer lined with cheesecloth set over a bowl. Cover and refrigerate overnight. This removes excess moisture and guarantees a dense, creamy cheesecake filling that slices cleanly and holds its shape beautifully.
- Preheat your oven to 325°F (163°C). Grease a 9-inch springform pan and wrap the outside tightly with two layers of aluminum foil to prepare for the water bath. Set aside.
- In a medium bowl, stir together the graham cracker crumbs, granulated sugar, cinnamon, and melted butter until the mixture resembles wet sand and holds together when pressed. Transfer it into the prepared springform pan and press it firmly and evenly across the bottom and slightly up the sides using the back of a spoon or flat-bottomed glass.
- Bake the crust for 10 minutes until lightly set and fragrant. Remove from the oven and allow it to cool completely while you prepare the filling.
- In a large bowl, beat the drained ricotta on medium speed until completely smooth and creamy, about 2 minutes. Add the softened cream cheese and beat together for another 2–3 minutes until the mixture is unified, silky, and completely lump-free. Scrape down the sides of the bowl as needed.
- Add the honey and granulated sugar and beat on low speed until fully incorporated. Mix in the vanilla extract, fresh lemon juice, lemon zest, and sea salt until fragrant and evenly blended throughout the batter.
- Add the eggs one at a time, beating on the lowest speed just until each one is incorporated before adding the next. Overmixing the eggs at this stage incorporates too much air and can cause the cheesecake to crack during baking. Add the flour and fold gently until just combined and the batter is smooth and glossy.
- Pour the filling over the cooled crust and smooth the top evenly with a spatula. Place the foil-wrapped springform pan into a large roasting pan and pour enough hot water into the roasting pan to reach halfway up the sides of the springform pan, creating a gentle water bath.
- Bake for 52–58 minutes until the edges are set and the center has a soft, gentle jiggle when the pan is nudged. The cheesecake will continue to firm up as it cools — do not overbake or the texture will become grainy rather than silky.
- Turn off the oven and crack the door open slightly. Allow the cheesecake to rest inside for 1 hour to cool gradually and prevent cracking. Remove from the water bath and allow it to cool completely on a wire rack before refrigerating.
- Once at room temperature, refrigerate the cheesecake uncovered for at least 4 hours or overnight until fully set, chilled, and perfectly sliceable.
- Shortly before serving, prepare the fig compote. In a small saucepan over medium-low heat, combine the quartered figs, honey, water, fresh lemon juice, vanilla extract, sea salt, and thyme sprigs if using. Stir gently and cook for 10–12 minutes, stirring occasionally, until the figs have softened and broken down slightly into a thick, glossy, deeply fragrant compote. Remove the thyme sprigs and allow the compote to cool for 5 minutes before serving.
- Release the springform pan and transfer the chilled cheesecake to a serving plate or cake stand. Spoon the warm fig compote generously over the top, allowing it to spill naturally and beautifully over the edges. Slice into clean wedges and serve immediately.
Tip:
Never skip draining the ricotta overnight — excess moisture is the enemy of a clean, firm cheesecake slice. The extra step of draining transforms the texture entirely and is what separates a truly exceptional ricotta cheesecake from one that is dense and watery.
You May Also Like
20 Healthy and Easy Spring Breakfast Ideas to Energize Your Morning
20 Easy Spring Snack Ideas for Quick and Delicious Munching
21 Fresh Spring Lunch Ideas That Are Healthy, Light, and Perfect for Warmer Days
25 Vibrant Spring Dinner Ideas for Flavorful Evenings
24 Refreshing Spring Drink Ideas to Quench Your Thirst
Takeaways: 22 Dreamy Spring Dessert Ideas to Sweeten Your Day
There is something truly special about the way a beautifully made dessert can turn an ordinary day into something worth savoring, and that is exactly what this roundup of the best spring dessert ideas was created to do. Each recipe was thoughtfully put together to bring out the very best of the season — pairing vibrant seasonal baking ingredients with approachable techniques and stunning results that anyone can achieve right at home. Whether you prefer something light and fruity, creamy and indulgent, or delicate and elegant, this list has a little something for every taste and every mood. I truly hope you found your new favorite dessert here for this spring season — one that will bring a smile to your face every single time you make it.
If this collection of simple spring dessert inspiration sparked something in you, feel free to bookmark and revisit this page anytime the season calls for something sweet. And if someone you love deserves a little sweetness in their day — and let’s be honest, they absolutely do — please go ahead and share this with them because good food is always better when passed along to the people who matter most. Here is to a spring filled with warm afternoons, fresh flavors, and gorgeous spring desserts that make every single bite worth it. Happy baking!
